You'll need two different types of metal for your PrintNC build :
- steel tubes for the frame
- aluminum for the Z axis
For details on Ballscrews click here: https://wiki.printnc.info/en/ball-screws
¶ Steel
A standard PrintNC uses hollow structural section (HSS) steel tubing for the frame. Prototype designs used aluminum extrusions, but were replaced with steel for its increased performance.
¶ Why steel ?
¶ Stiffness
Stiffness is the resistance of a material to deform under load. This is incredibly important to CNC applications, where your machining quality relies on the minimization of frame deformation (i.e. maximizing rigidity). Thankfully, steel ALWAYS has roughly the same stiffness (±5%), regardless of any heat treatment or alloy.
Steel is about 3x as stiff as aluminum of equal dimensions.
Strength is the amount of load the material can take before permanent deformation (yield strength) or failure (ultimate strength). Strength varies significantly between metals, alloys, and heat treatments. However, your frame should never permanently deform or break. Therefore, strength is not a property that should concern your buying decisions. High strength steel will not yield performance gains.
¶ Weight
Steel is about 2.5x as dense as aluminum. Weight dampens vibrations and can result in parts with better surface finish.
¶ Price and Availability
Structural steel is inexpensive, resulting in an incredibly high stiffness/cost ratio. It is also easily purchasable from a local supplier in your area with minimal lead times.
¶ PrintNC steel
The PrintNC design is parametric, meaning it will adjust to many sizes of steel.
¶ Steel needed
|
The PrintNC will need several beams for the build :
|
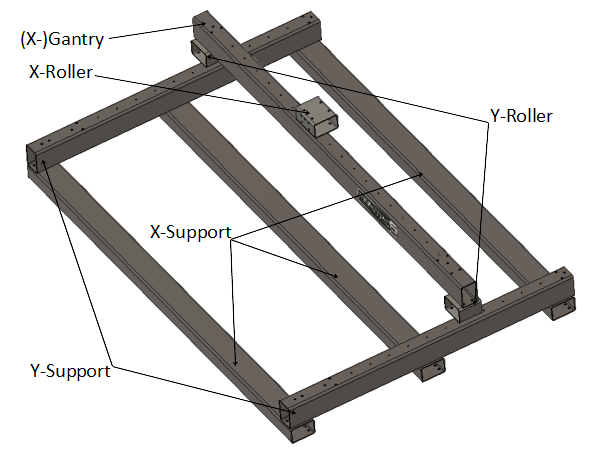 |
¶ Steel naming convention
Steel tubes are always defined using 3 figures. For example : 75mm x 50mm x 3mm
¶ “long” side
The “long” side is always the highest value (in our example, 75mm). It's also called “width".
¶ "short" side
The “short” side is always the lowest value (in our example, 50mm). It's also called “height”.
¶ thickness
Finally, the last figure always represents the thickness.
¶ Steel tubes dimension
The default choice is 75mm x 50mm x 3mm (3" x 2" x 0.12") Hot or Cold Rolled Steel Tubing (e.g. A513).
For V4 Metalcutter, 75x75x4mm is default for gantry lengths under 1200mm. Over 1200mm, it's recommended to use 100x75x4mm.
For V4 Woodcutter, over 1500mm gantry lengths it's recommended to use 100x50x3mm.
Some builders have chosen larger dimensions for increased rigidity, extra Z clearance, or simple availability.
Here's a list of steel tubes that can be used for the PrintNC :
#Note - Using frame height of 100mm means switching to the 350mm height Z plate, linear rails and 1204 ballscrew to have enough travel.
¶ Metric units
Recommended for frame and gantry for Woodcutter:
- 75mm x 50mm
- 80mm x 50mm
- 80mm x 60mm
- 100mm x 50mm
For Metalcutter gantry, the following are recommended up to 1200mm length:
- 75mm x 75mm
- 80mm x 80mm
For Metalcutter gantry over 1200mm length:
- 75mm x 100mm
- 80mm x 100mm
! 100x60 is not supported by the fusion model (but could possibly be made working by manually fixing the errors).
You can select a thickness of 3mm, 4mm or 5mm for all those tube dimensions (except for the rollers, which require a max thickness of 4mm if using the default 2x3" or 50x75).
Thinner tubes like 2mm or 2.3mm steel tubing is not recommended. In order to have a good bolt attachment, you need at least 3 holding threads and M6 bolts have 1 thread per mm, hence the 3mm minimum.
However, the X frame could be thinner if necessary, as it does not have any threaded holes. If you absolutely must use steel tubes thinner than 3mm for the Y-frame, you need to use backing or washers and nuts for the M6 bolts.
¶ Imperial units
- 2" x 3"
- 2" x 4"
You can select a thickness of 0.12 or 0.178 for all those tube dimensions.
¶ Steel fillet radius

¶ Definition
Each steel tube has a fillet at the intersection of two faces. This fillet has a specific radius, dependent of the thickness of the tube.
You'll need to know the fillet radius to correctly print all 3D printed parts. You can use this tool to discover it.
¶ Radius concerns
Be careful not to select steel tube 5mm (0.178") thickness or above, for the short tubing sections (X roller and Y rollers).
Steel tubing generally increases bending radius with increasing wall thickness. With a large enough radius, design issues will start to arise in some of the steel sections.
If you buy 50x75 (2x3") tube with a thickness above 5mm (0.178"), you'll need to buy tubes of less than 4.5mm thickness, for both the Y and X rollers.
80mm+ width steel rollers can be up to 5mm thick.
¶ Consequences of increased height/width
| Advantages | Disadvantages |
|---|---|
| Additional Z clearance. | Decreases rigidity by increased lever on spindle |
| Increased gantry stiffness |
¶ Increased Width / long side
| Advantages | Disadvantages |
|---|---|
| Additional Z clearance. | Decreases rigidity by increased lever on spindle |
¶ Tall, Wide, Thick, Thin.. How Should I Modify my Steel for Maximum Rigidity
Before making any purchases, size your build and make the suggested adjustments to maintain adequate rigidity. However, remember that rigidity rapidly decreases when increasing gantry (x dimension) length.
¶ Thickness
Buying thicker steel will increase the rigidity of your machine and increase weight.
¶ Stiffness Comparison

It is worth noting, however, that there are many more points of deformation in a CNC frame that play a significant role. Therefore, do not expect a 50% stiffer frame by simply increasing wall thickness from 3 to 5mm. This requires simulations to solve.
There are also downsides to increasing thickness. For example, increasing mass will also increase inertia. You may notice a decrease in maximum deceleration/acceleration. In addition, design issues come into effect when increasing thickness above 4.5mm (0.178") as discussed in the section above.
Sources : Stiffness Improvements Over 3mm Tubing, Rectangular Tube Section Calculator
¶ In-Depth steel details
If you want to know more about steel and its standard, heads up to this page !
¶ Aluminum
|
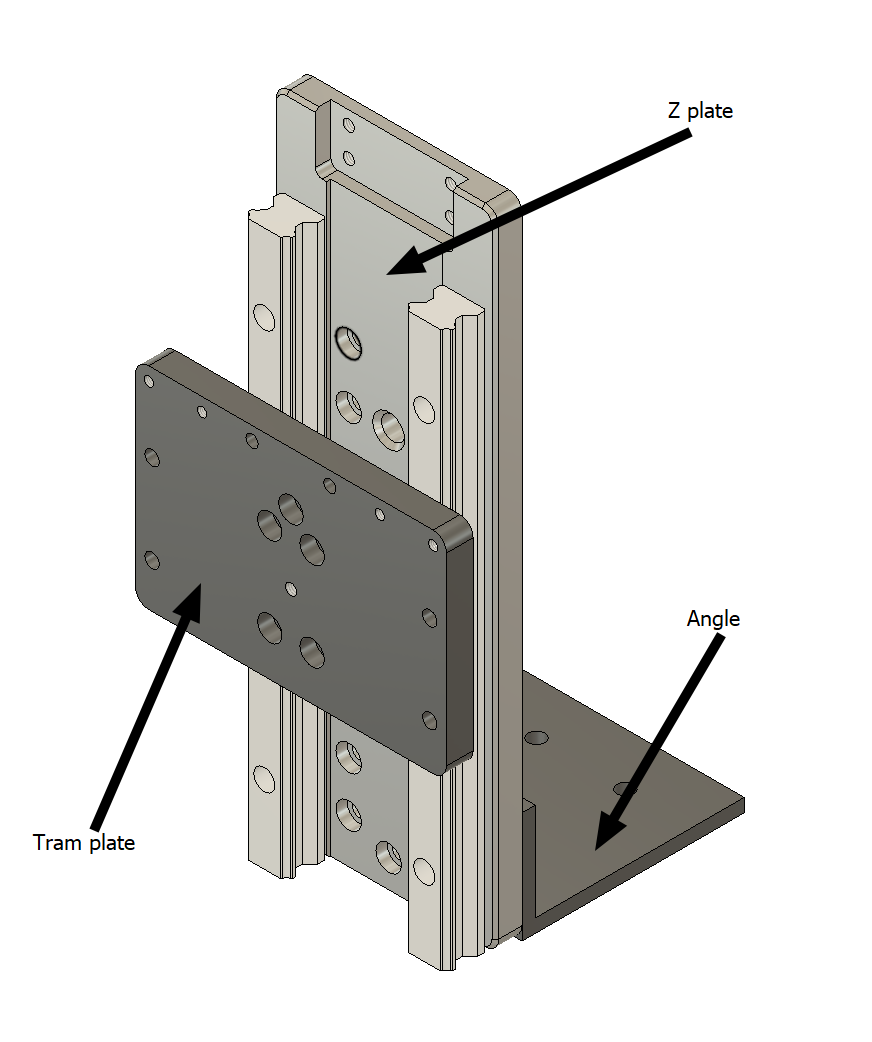
The PrintNC is mainly built of steel tubes. However, there are some aluminum parts that are used in several places :
It is possible to make at least some of these parts out of mild steel plates, if you have access to sufficient tooling. Details here. not in the image:
|
|
¶ Aluminum alloys
Aluminum exists in different alloys. Here are the main ones:
- 6061 is a very common alloy and has good mechanical properties.
- 6063 is another very common alloy. It has less strength than 6061, but its extrusion allows complex shapes to be formed with very smooth surfaces. Corners done in aluminum 6063 have a square angle (0mm radius). 6063 is therefore preferred for the angle part.
- 5083 is commonly used in marine environments, as it's highly resistant to attack by seawater and industrial chemicals. It has also the highest strength of the non-heat treatable alloy
¶ Angle part
This part will be linked to a HGW20CC carriage, moving along the bottom rail on the X gantry. It's also bolted to the Z plate. This part is mandatory to complete a PrintNC build.
By default, it's a 6mm thick corner plate. Its dimension are dependent of your steel tube dimension : the angle will have the “long” side equal to your tube width and the “short” side equal to your tube height. For example, if you have entered a 80mm x 50mm steel tube in the parameters, the angle will be a 80mm by 50mm corner.
You can change this parameters if you want. For that, update the Fusion parameters angleLong and angleShort.
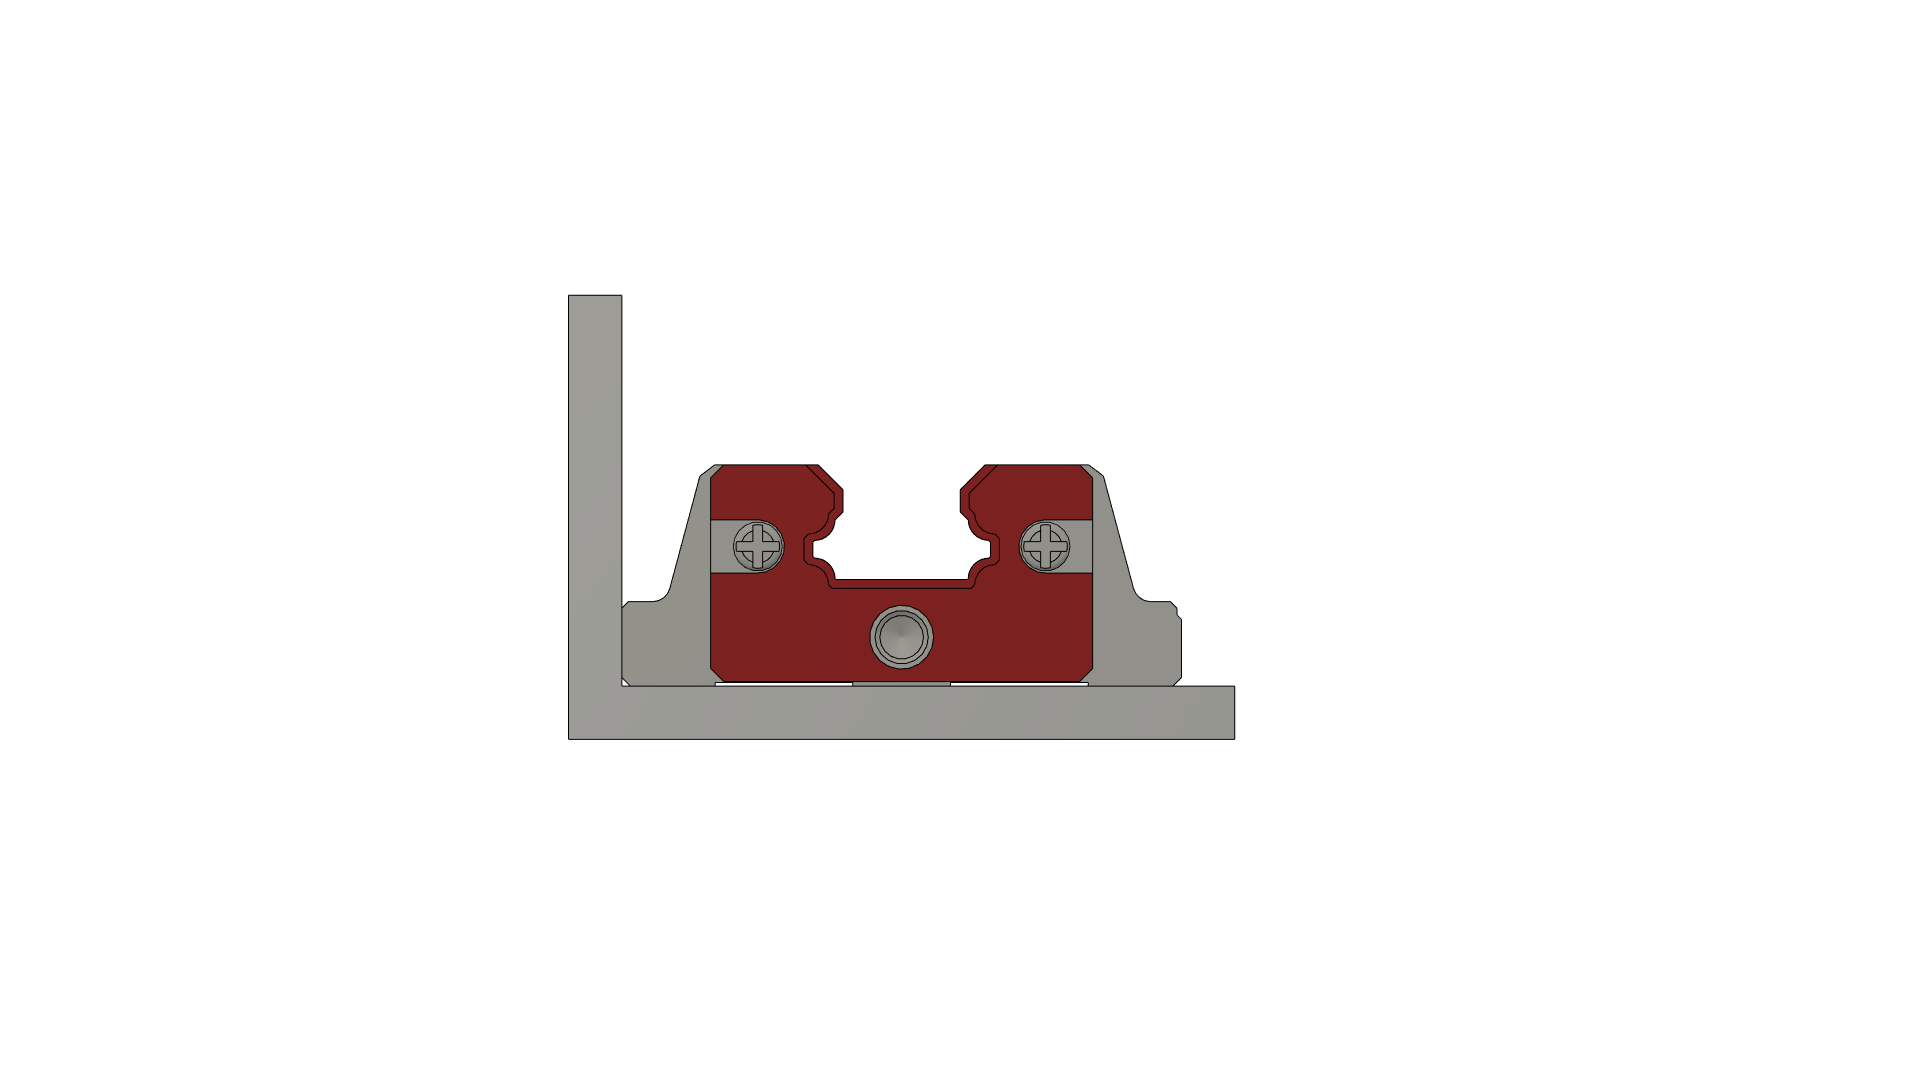
¶ Internal corner radius problem
|
For standard builds ( 50x75mm and 2x3"), the angle aluminum part will have just enough space to accept the bottom X gantry carriage, which will sit exactly in the corner. As a result, it is highly recommend to get a 6063 aluminum corner, as it'll allow you to mount the carriage without any problem. If a 6061 aluminum corner is bought, the internal corner radius will prevent you from mounting the carriage correctly. You can still buy one, but you'll have to manually file or grind the inside radius away, in order to ensure a proper installation of the carriage. This problem doesn't exist for bigger steel tubes, as the plate will be wider as well, allowing you to mount the carriage away from the internal corner. |
|
¶ Z plate
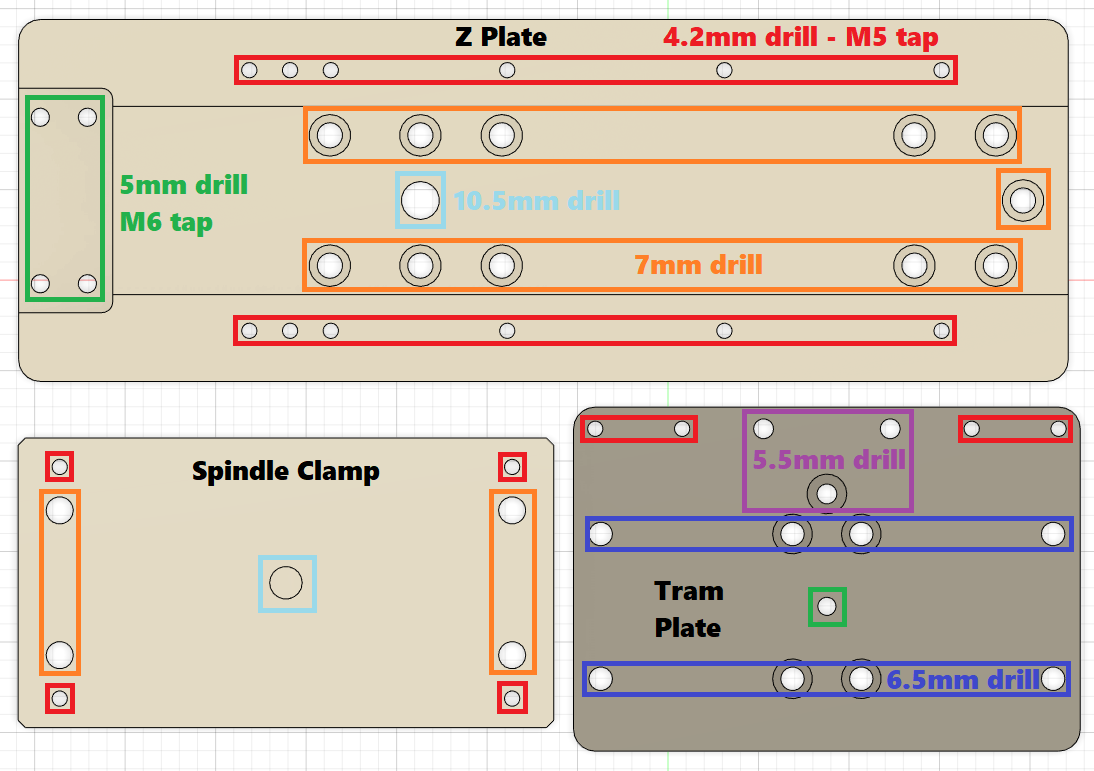
The Z plate is bolted to both the angle part and the X roller. It also supports both Z linear rails with their relevant carriages.
It's thickness can be anywhere between 10mm and 15 mm, with a sweet spot at 12.5mm.
Here are a few options to get a Z plate for your build :
- Make it yourself
- Machine in aluminum/wood with your own CNC (e.g. MPCNC)
- Handcraft aluminum plates using woodworking tools (aluminum can be machined easily using woodworking tools)
- Handcraft plywood plates to get your machine running, then machine them on your new PrintNC
- drawing for wooden plate with measurements (A3 size)
- drawing for wooden faceplate without measuements (A4 size)
- drawing for wooden faceplate without measuements (letter size) (does not fit the full plate, but can still be used to align all holes)
- You can print this drawing and glue it directly on the wood to mark the holes. Be sure to check after printing that it is at 1:1 scale.
- If you have a 3D printer (or don't have a 2D printer):
Another possibility is to 3D print the two STLs below and use these in the same way as the other assembly tools to mark the wood.
To do this, print these two STL files (z-plate-top and z-plate-bottom), and place z-plate-top on your wood. Trace the perimeter with a pen/scribe, then use a transfer punch to carefully mark the holes. The bottom line of holes will act as alignment for the second tool, so lay the z-plate-bottom tool on the wood, aligning it carefully with the bottom set of holes already made, and complete the transfer of holes and perimeter. - You will also need two other pieces: a tramming plate spacer, and four rail spacers. These are only required if you are building the wood Z-plate. The tramming plate spacer is simply a spacer, rather than a tramming device (the wood Z-plate des not have tramming capability, but the spacer is required so that the spindle doesn't collide with the Z stepper mount). Print this on your 3D printer and use it as a template - or print in on your 2D printer and glue it to your wood. The rail spacers lift the rails up from the surface of the flat wood Z-plate. These are to be printed and used as-is.
- Ask the Discord #marketplace to see if anyone will make them for you
List of known makers → https://wiki.printnc.info/en/v3/buying/Z-AxisMarketplace - Ask a local machine shop
- Utilize Aliexpress or a similar service
¶ Tram plate
A tram plate is a 12mm thick aluminum plate used to adjust your spindle and make it parallel to the wasteboard. It's bolted onto the Z carriages and supports the spindle clamp.
Like the Z plate, you can use a simple wood plate as a tram plate, to finish the assembly. You can then later cut an aluminum tram plate as a replacement.
drawing for wooden tram plate (A4) (letter)
¶ Spindle clamp
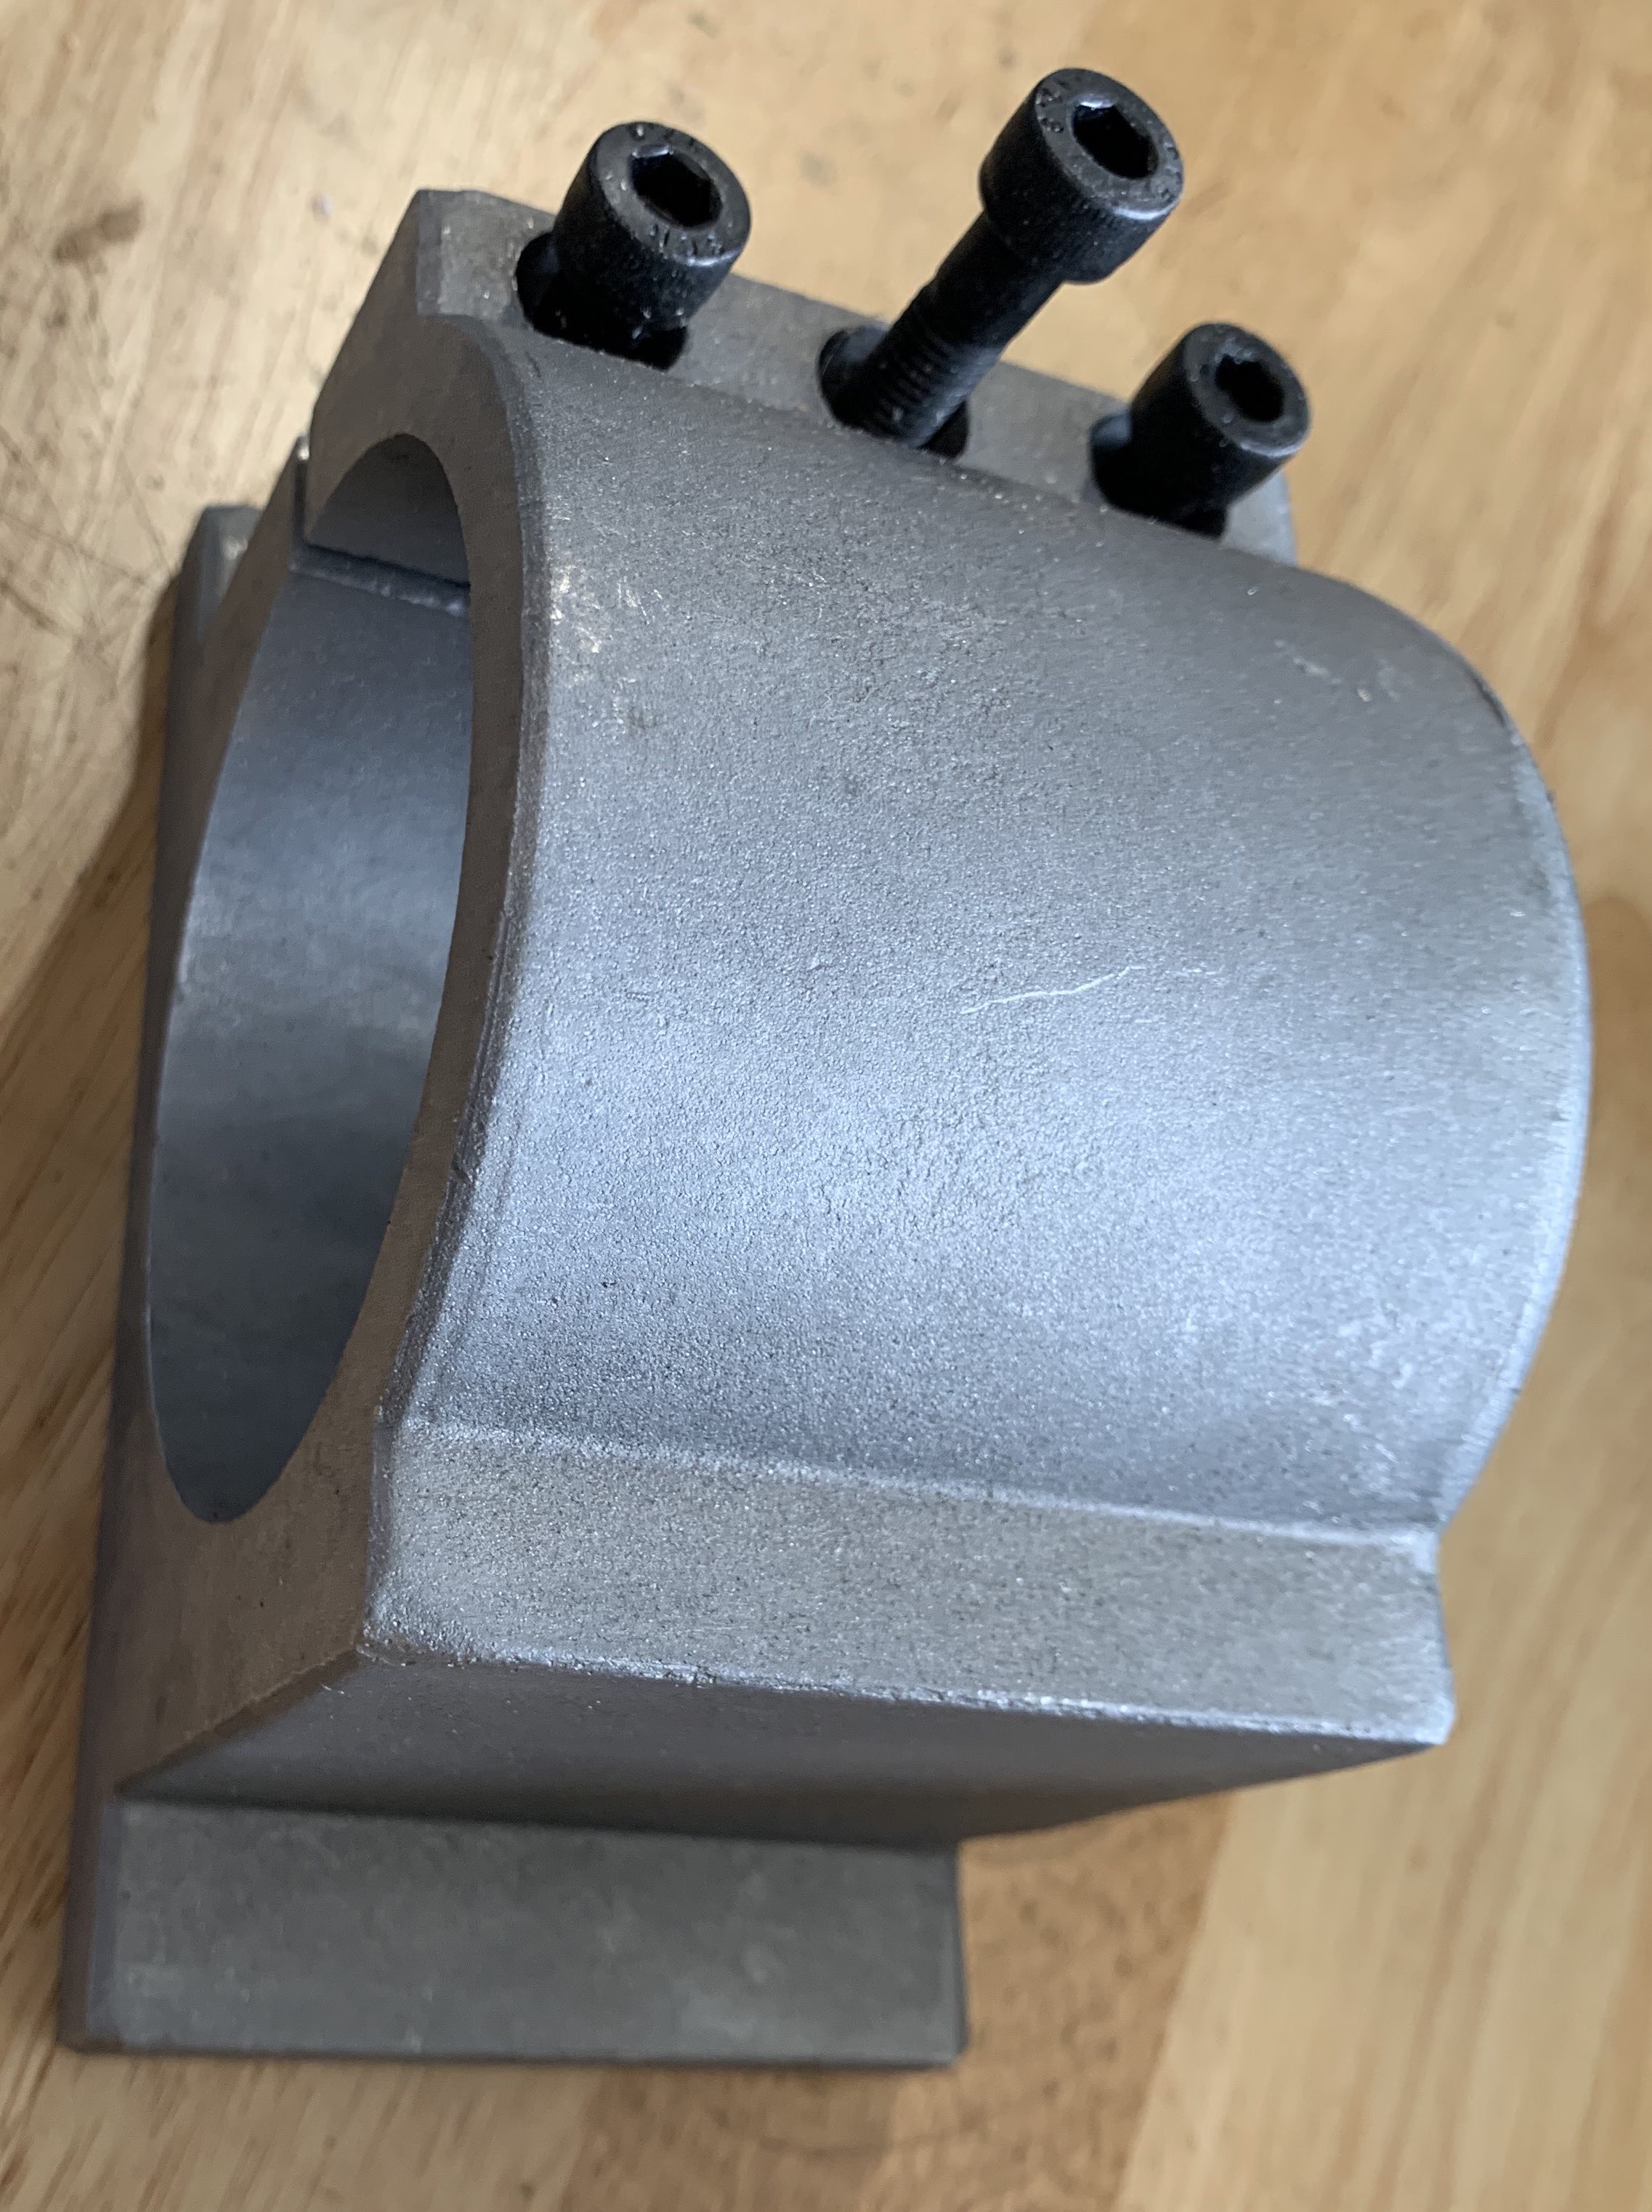
The spindle clamp (also known as the spindle bracket) is usually an aluminum clamp used to hold the spindle.
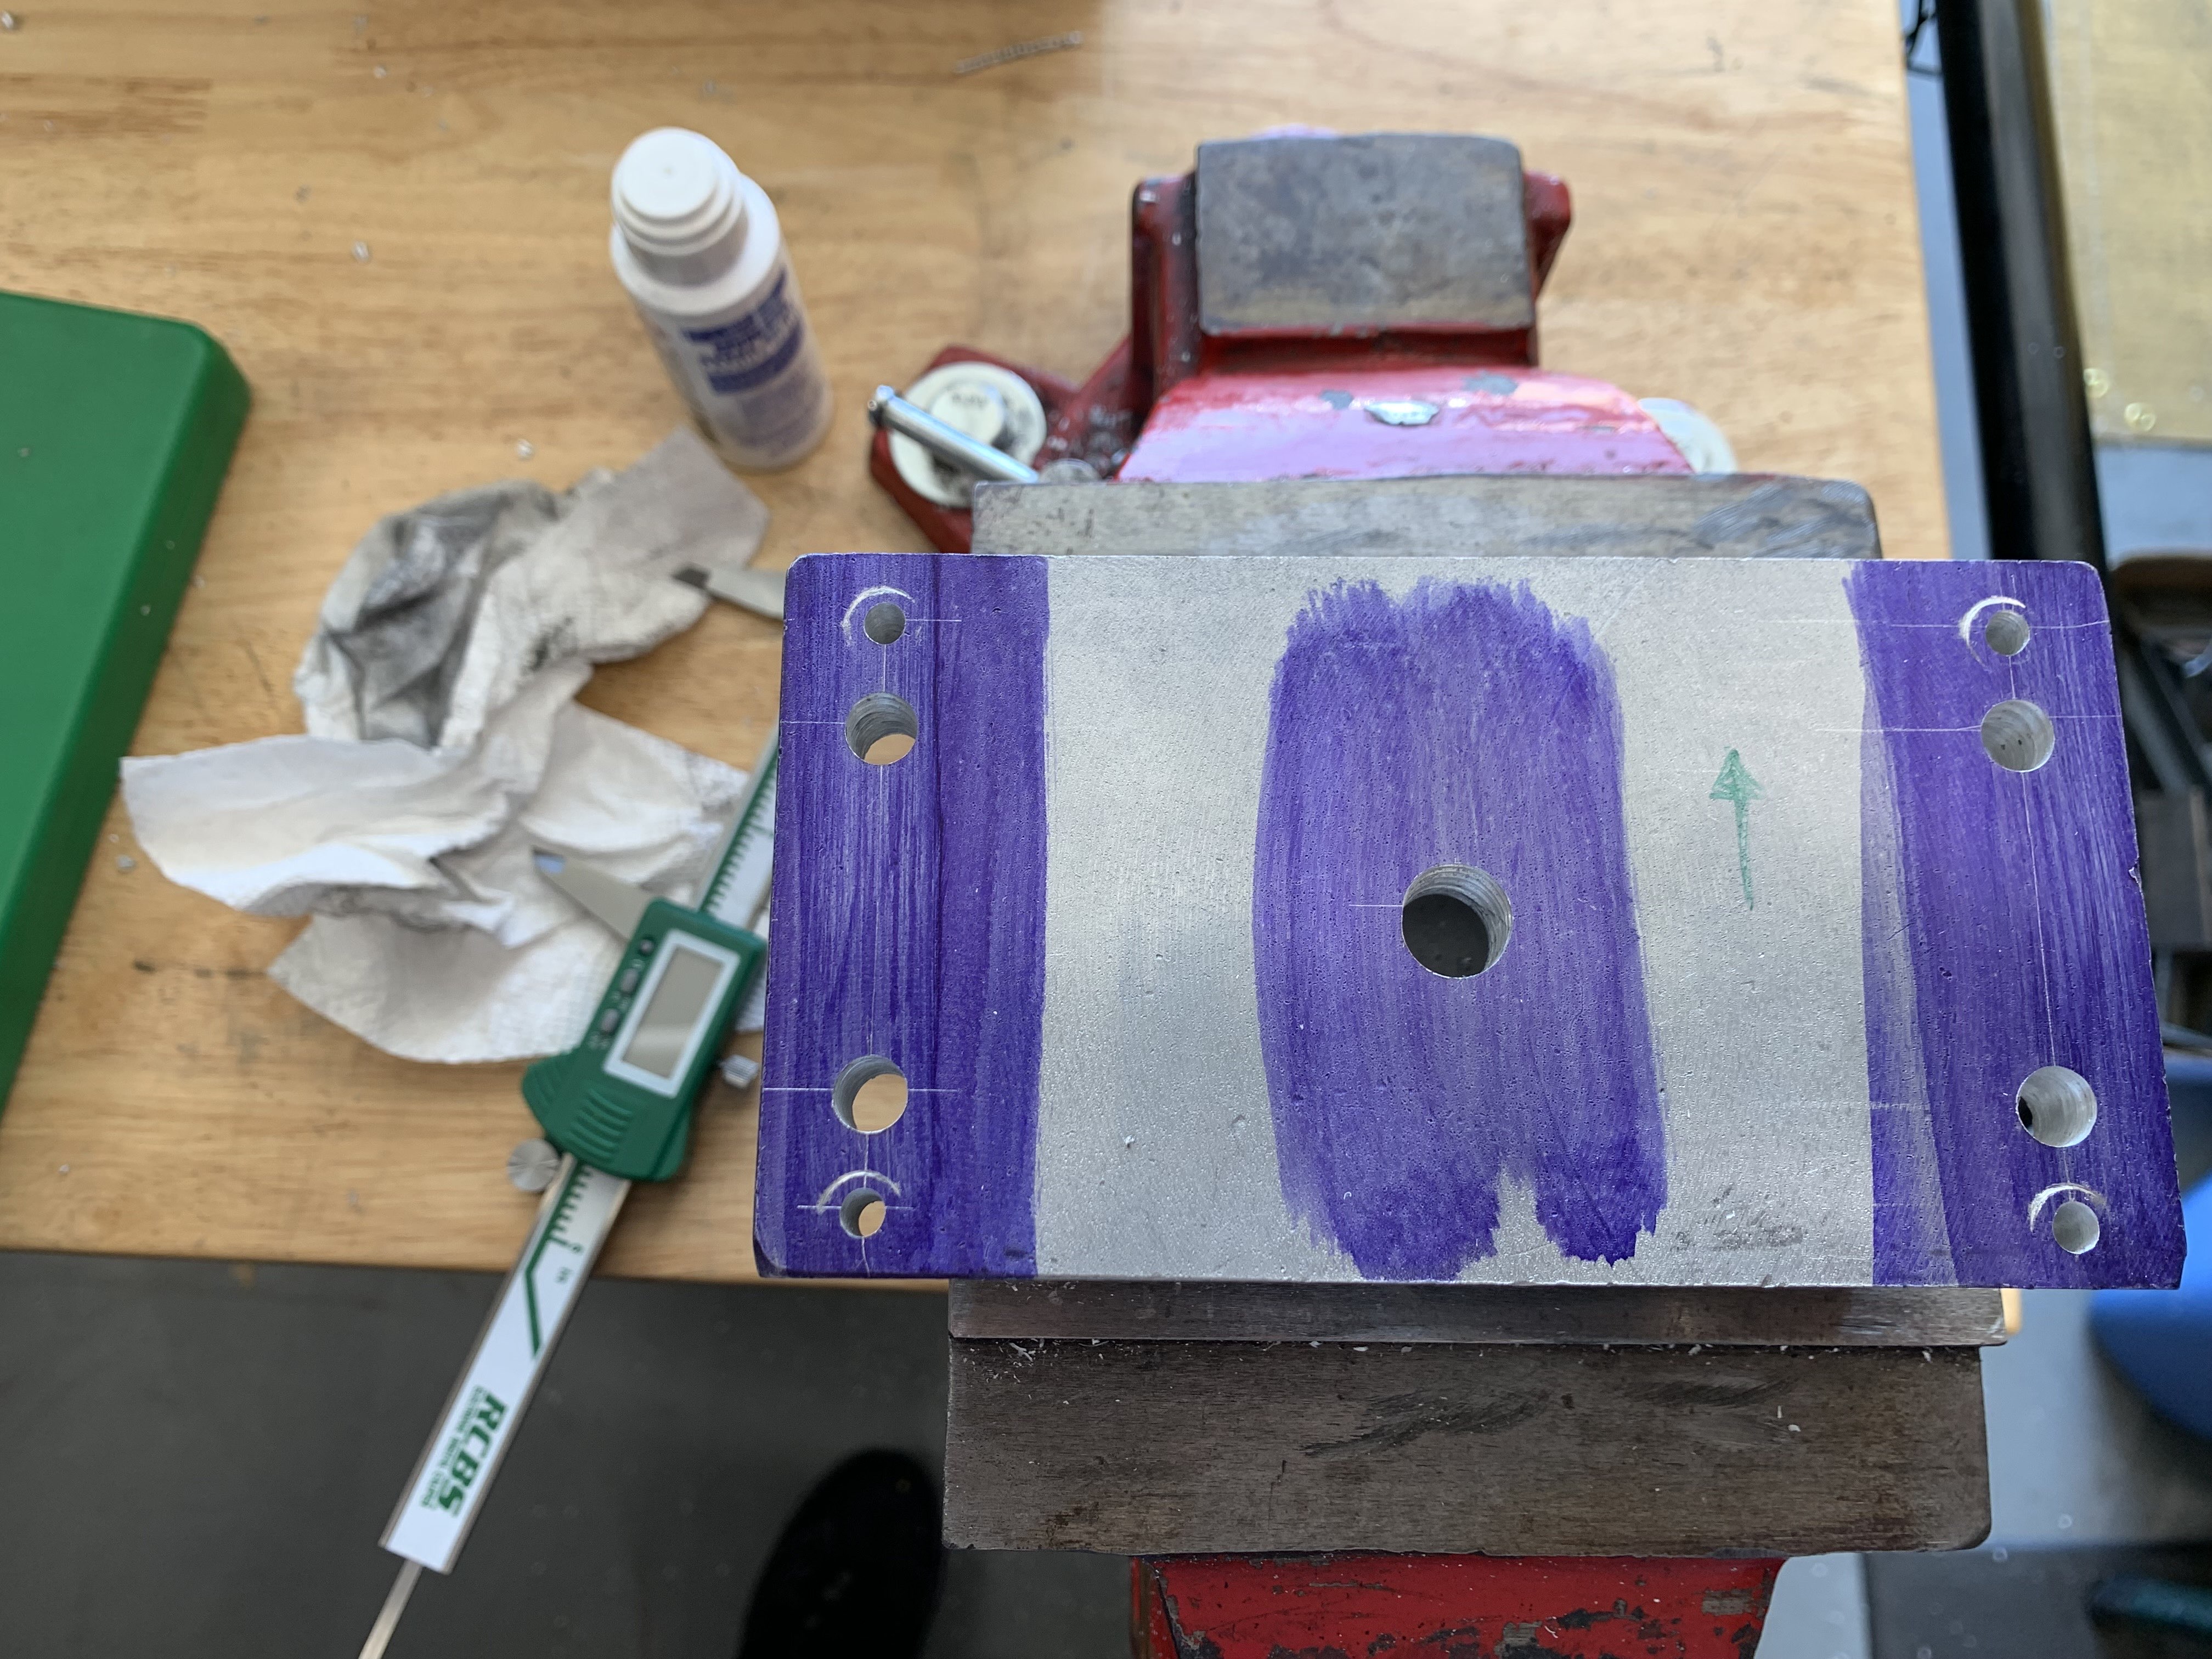
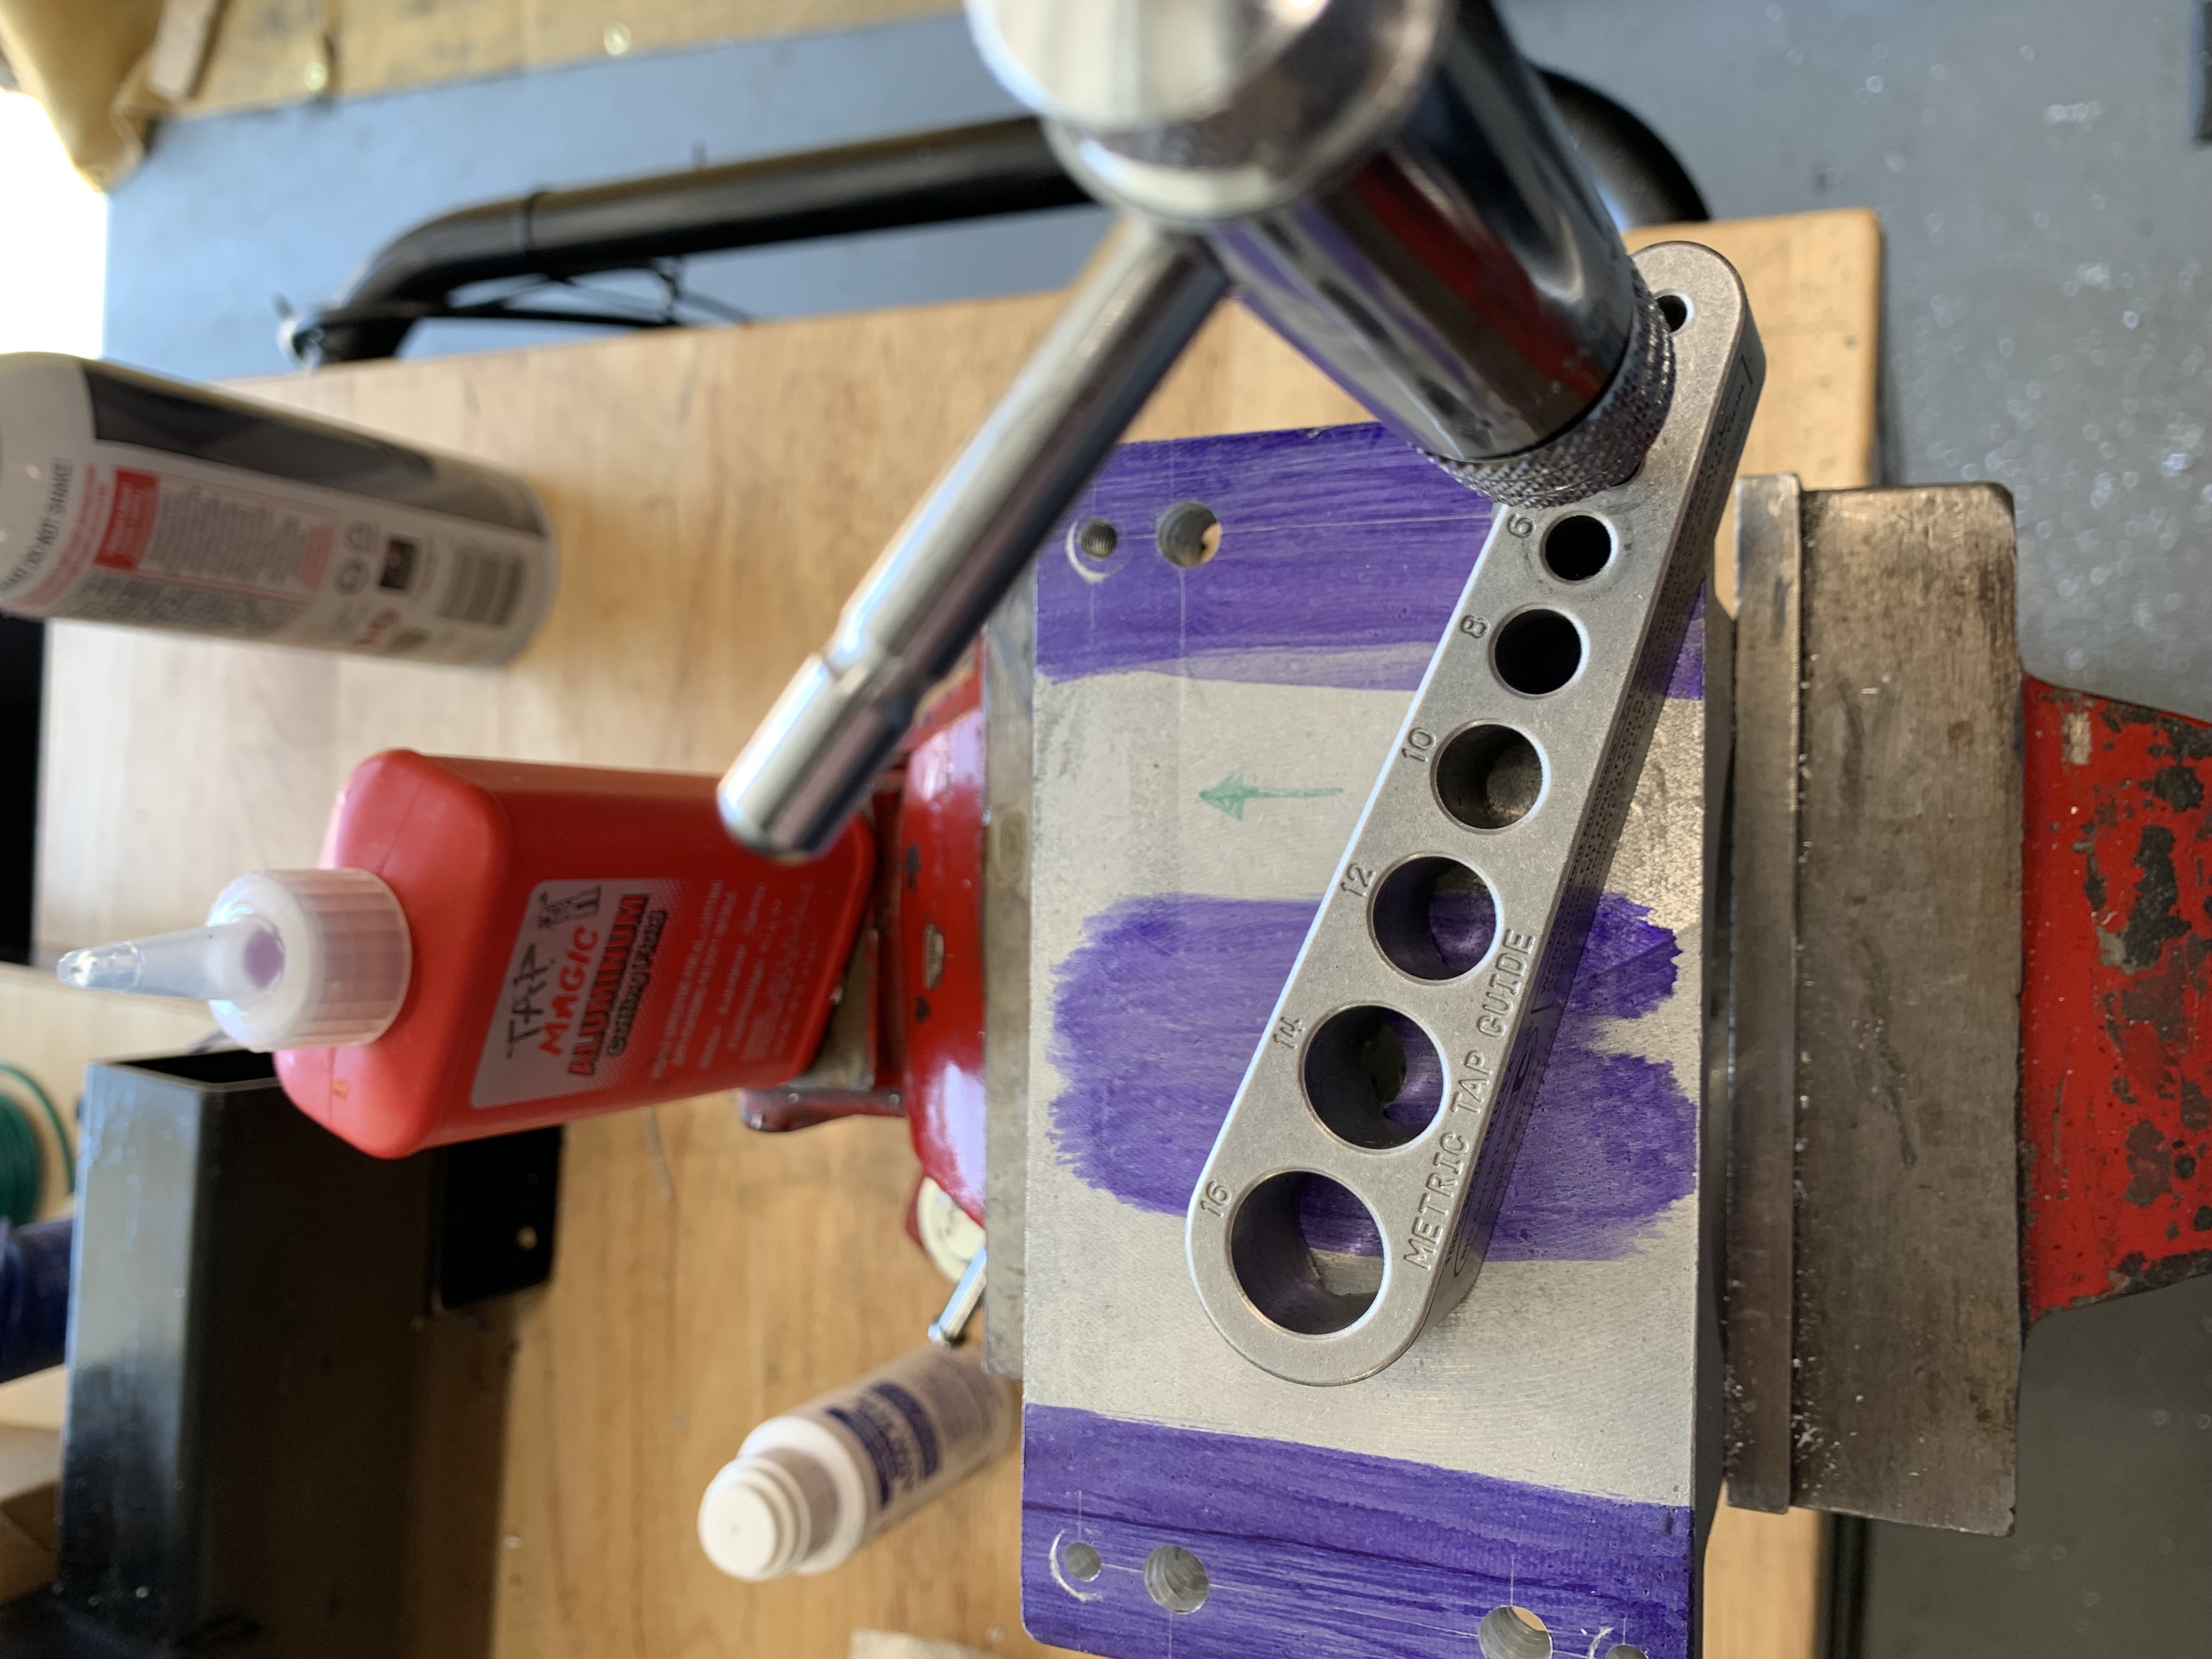
There's normally no mounting holes in the spindle clamp, so you'll need to drill and tap these yourself.
The top and bottom tapped holes for the bracket are sometimes not tapped deep enough to properly secure the spindle in its place. If this is the case, use an M8 tap to deepen the hole.
See Spindle Bracket drawing (A4) (letter) for dimensions. You can print that drawing on paper (100% size), glue it onto the bracket and mark the holes. If you have matching transfer punches you can also transfer the holes from the tramming plate to the spindle bracket. For those that do not have a 10.5 mm bit, you can probably use an 11 mm bit or a 13/32 bit for the center pivot hole in the back of the spindle clamp/bracket. Blue Dykem and digital calipers are helpful if doing this by hand.
|
|
|
¶ “T” Nut block
On the v3 of the Z-Axis, there is a “T” Nut block. It can be either 3d printed or can be milled from aluminum. See the T Nut Block drawing for details. The raw part can be found as a standard part from multiple sellers as “aluminum 1204 nut housing” with predrilled center bore and threaded holes for attaching the ballscrew nut.
If you want to use the alu nut block from the beginning before you have any milling capabilities, you can also cut the part into shape with a saw. Taking away a millimeter too much is uncritical.
You also need to drill and tap 3 holes according to the drawing.
¶ How to buy metal
Get several quotes from local suppliers. Even for the same franchise (e.g. Metal Supermarkets) in the same area, prices could be significantly different.
You can also use online suppliers, but remember that due to weight, shipping may be expensive. However, depending of the steel market in your area, this may be a viable option.
Ideally, your supplier should be able to provide you both steel and aluminum.
¶ Steel buying tips
Steel is standardized in length (for example, steel beam of 6m long in Europe). It may be interesting to buy a “full” steel beam even if it's more than you need, as some suppliers may offer a discount.
¶ Aluminum buying tips
Verify the type of aluminum alloy your supplier can provide. Ideally, you should get 6063 aluminum for the angle plate, for the reasons mentioned in the section above.
¶ Suppliers
¶ Steel
Check the steel suppliers page.