¶ Why would you NOT do this?
There may be members who have already built boards in your area, and have them ready to sell. Check the GRBLHAL2000 Marketplace wiki page, or ask in the Discord marketplace channel, to find one that's already been lovingly ordered, assembled and tested by a PrintNC community member.
If you don't have reasonably high-level soldering skills, don't know the difference between a resistor and an inductor, or don't have a lot of spare time for ordering, checking, testing, assembling, getting shipping details, receiving payments, packaging and sending out little bundles of electronics and connectors, this might not be the project for you.
You want to make a pile of money. Currently the material costs per board (for a batch of 10) are around AU$90/US$65/EUR55, and most builders are selling them near cost to help the community grow.
¶ Why would you do this?
There aren't any boards near you, or you have great electronics/soldering knowledge and you'd like to help other people get their own boards. Or perhaps you'd like an excellent CNC control board, sensor/button breakout and keypad jogger for around US$150.
¶ What do you need?
Tools - A basic soldering setup and the ability to solder 2.54mm & 2mm pitch through-hole pins. The Jog2K pendant requires soldering of a surface-mounted Raspberry Pi Pico and through-hole OLED screen assembly.
Parts - The boards from JLCPCB only ship with the components that are soldered in place, so all plugs, jumpers, cables and the Teensy 4.1/RasPi Pico microcontrollers will need to be procured from elsewhere.
Knowledge - If you can solder standard through-hole electronics you shouldn't have too much trouble.
Shipping materials - Secure packaging, reliable and affordable shipping. Each GRBLHAL2000 board and connectors will weigh around 300g and result in a package around 140x140x40mm. Packages with breakouts and jogger will be bigger.
Time - Organising, building and testing your order may take around a day all up for your first attempt. Collating order details, getting shipping quotes, taking payments and shipping orders can be quite time consuming if you're doing it all manually. Don't underestimate the time commitment to get 10 boards built, tested and shipped. As a Fermi estimate 10-100 hours might be appropriate.
¶ What does it cost?
For a 5-board batch you can expect materials and shipping to cost approximately:
5 x GRBLHAL2000 EST (Electronics Standardization Team) revision including Limit and Button breakouts, and Jog2K I2C Jogger Pendant
| USD | Euro | AUD | Notes | |
|---|---|---|---|---|
| JLCPCB Boards | US$355 | €335 | $510 | Fully assembled, including breakouts and Jog2K Pendant |
| LCSC Components | US$40 | €40 | $60 | Screw terminal header plugs, IDC connectors |
| Other Components | US$255 | €240 | $365 | Teensy 4.1, Raspberry Pi Pico, Jog2K screen and USB-C cable, ribbon cables etc. |
| Total | US$650 | €615 | $935 | |
| Cost per kit | US$130 | €125 | $185 |
10 x Original GRBLHAL2000 Board
| USD | Euro | AUD | Notes | |
|---|---|---|---|---|
| JLCPCB Boards | $230 | $320 | Fully assembled | |
| LCSC Components | $70 | $95 | ||
| Other Components | $355 | $500 | Teensy 4.1 and ribbon cable | |
| Total | $655 | $915 | ||
| Cost per Board | $66 | $92 |
¶ Could you TLDR it for me?
- Read this whole wiki page. It's a bit of a process, so you should make sure it's something you want to do before jumping in.
- Place PCB orders at JLCPCB
- Order additional components (plugs, jumpers, teensy headers) from LCSC or your favourite electronics supplier
- Order Teensy 4.1 and Raspberry Pi Pico boards and other extras
- Wait patiently for everything to arrive
- Solder Teensy to GRBLHAL2000 board, Raspberry Pi Pico and OLED screen to Jog2K
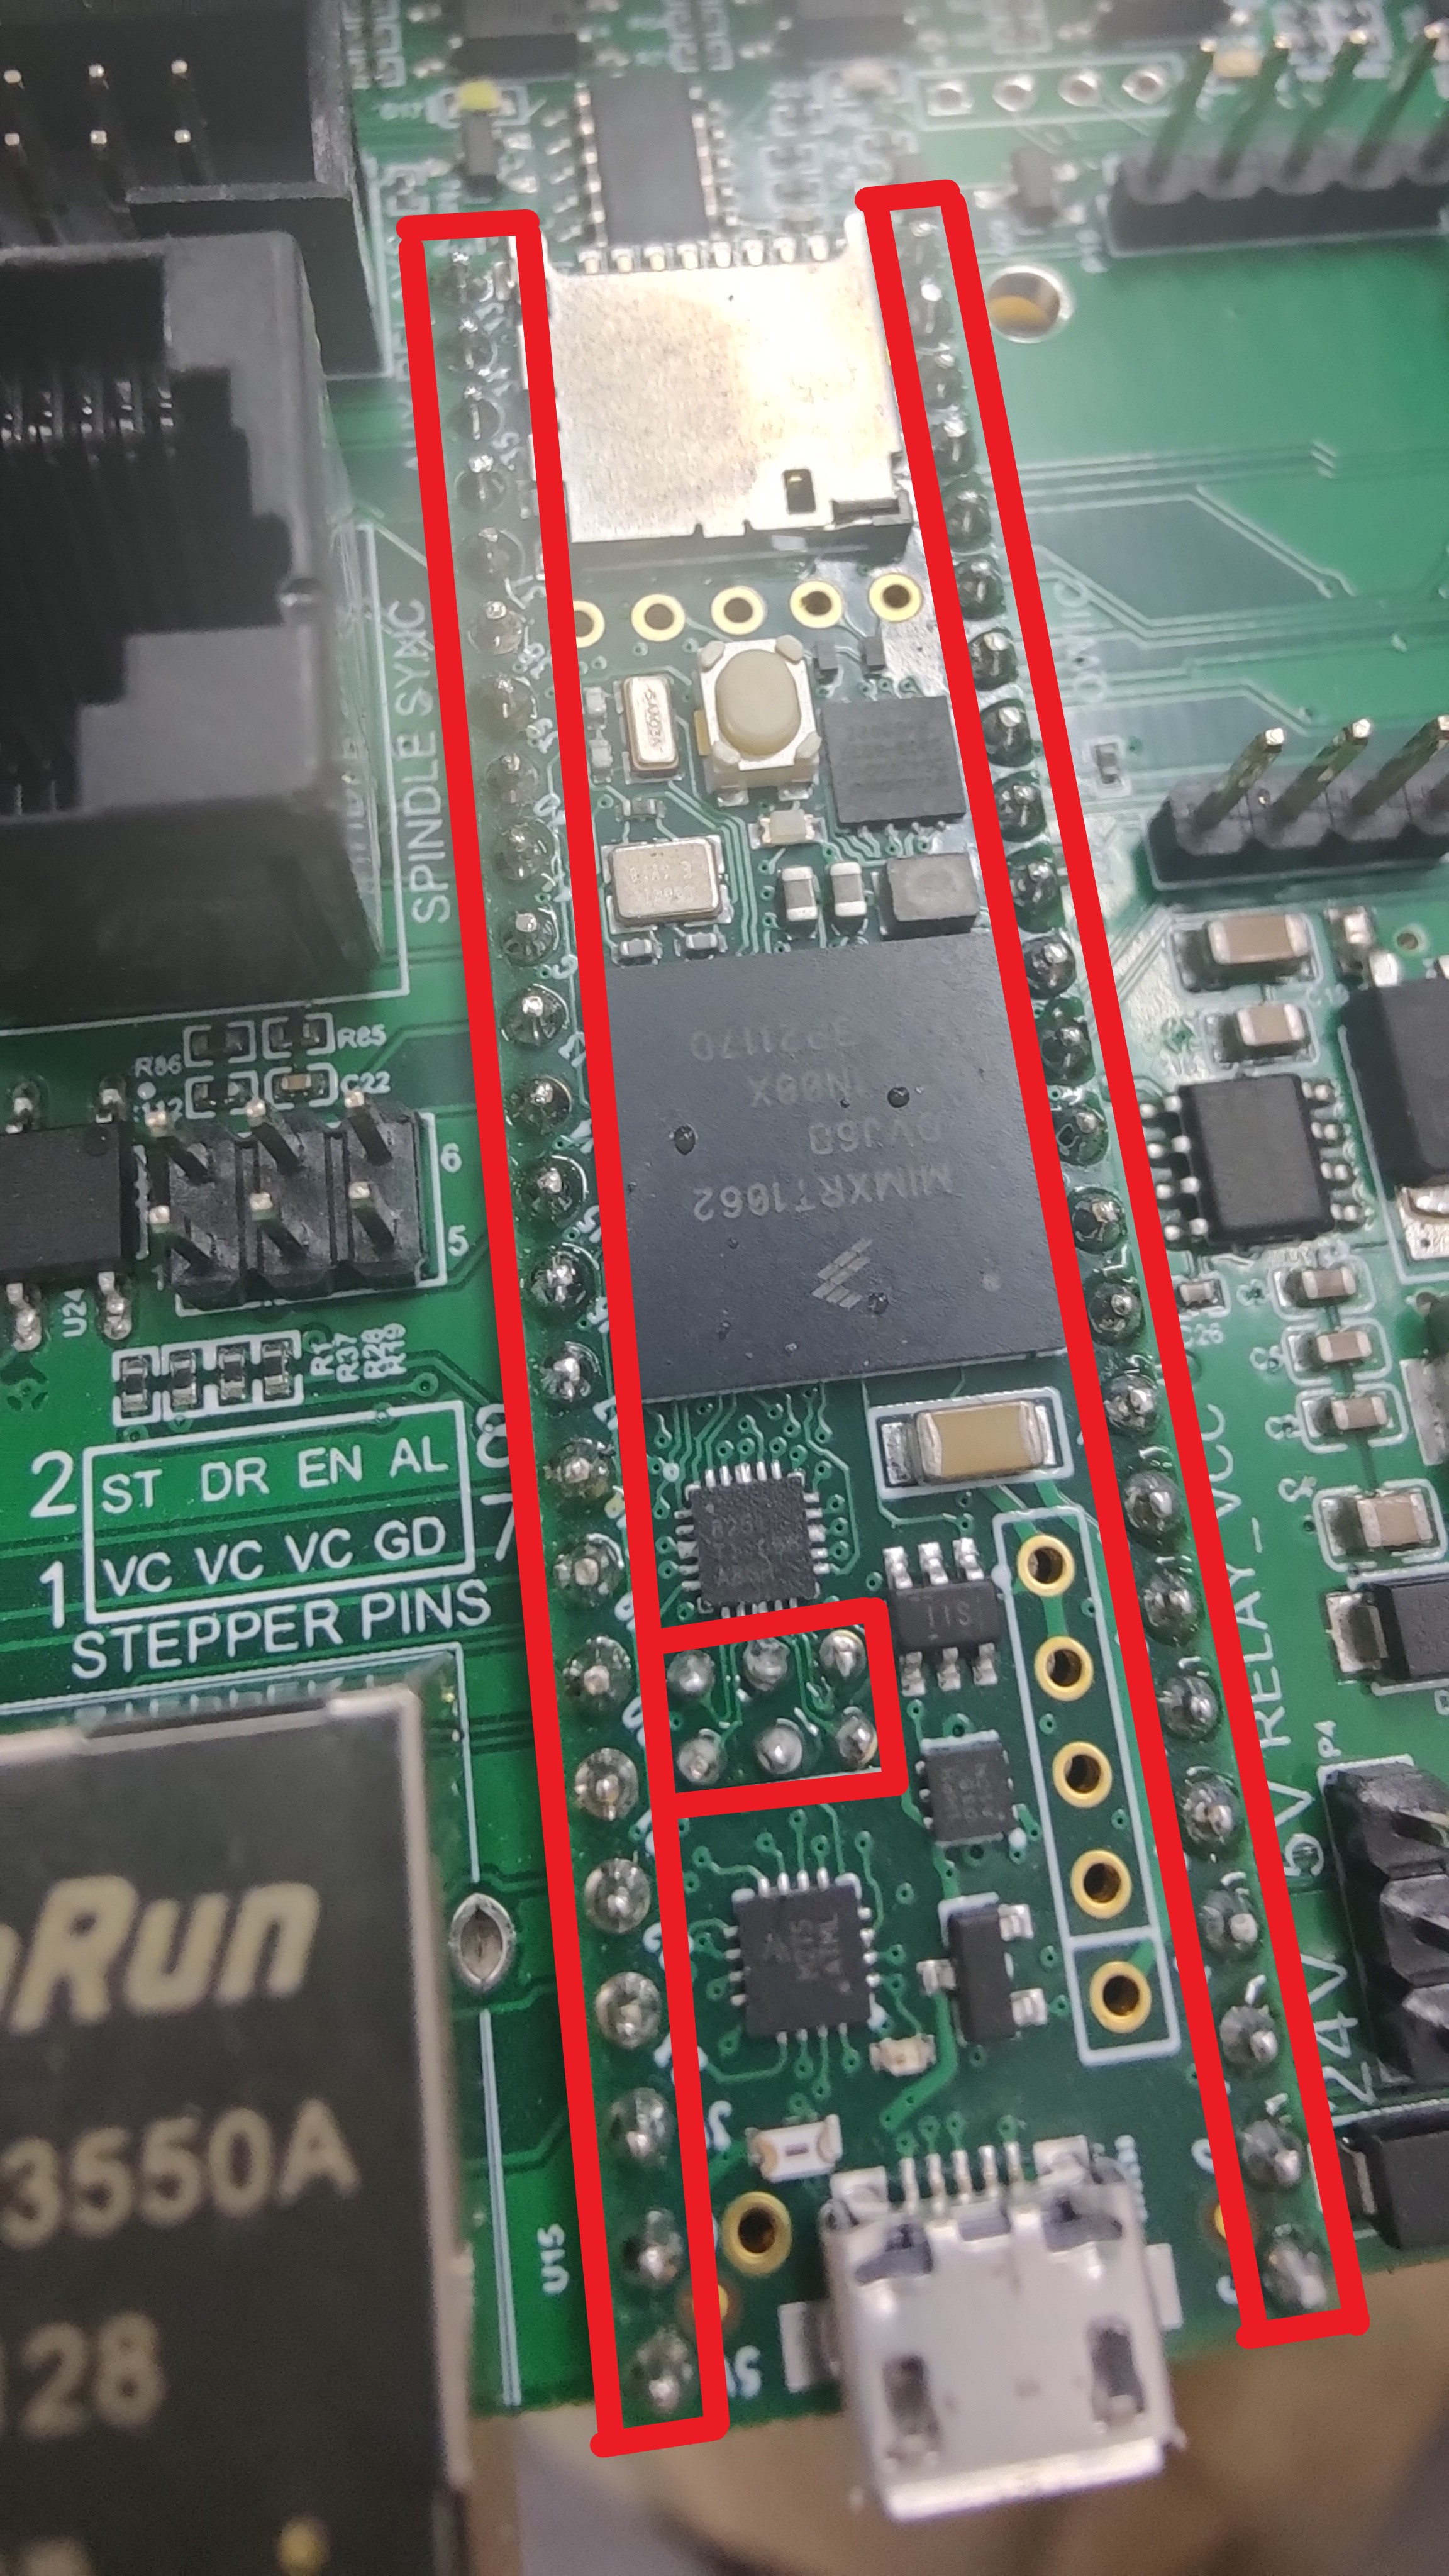
- Populate jumpers
- Test boards by flashing firmware, booting up with connectors in place, testing limit sensors, steppers etc.
- Send your fresh new GRBLHAL2000 boards to PrintNC community members or other CNC friends.
- Repeat from Step 2.
¶ Instructions for Ordering a GRBLHAL2000 board from JLCPCB
¶ Get the PCB files
Go to the Expatria Technologies grblhal_2000_printnc github and read the whole page. It won't take long, will answer approximately 87 questions you may subsequently have, and also confirm that this is indeed an excellent board that you really want controlling your CNC machine.
When you're done reading, download the .zip file:
Code > Download ZIP
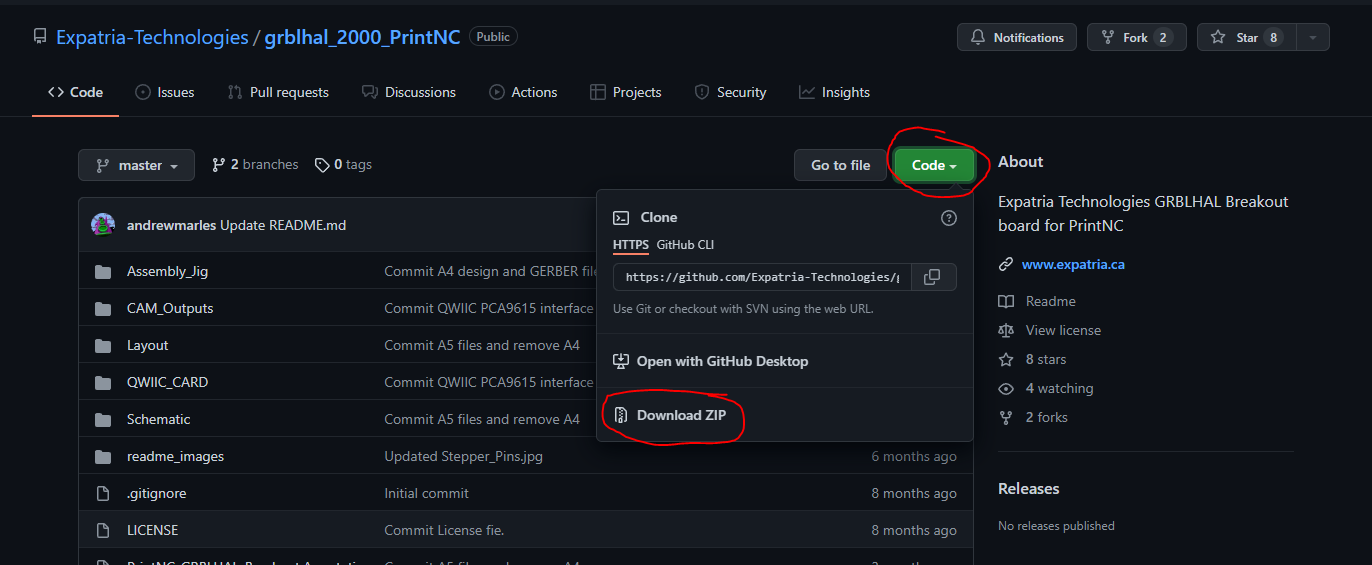
Unzip and have a look inside. The things you're most interested in are in the CAM_Outputs folder:
PrintNC_GRBLHAL_Breakout_UPLOAD_GERBERS_[revision number].zip-BOMfolder - Contains spreadsheets for both an SMT_ONLY (surface mount components) and FULL_ASSEMBLY (all surface mount and through-hole components that are physically attached to the board, other than the Teensy 4.1 microcontroller).
Note that the plugs, jumpers, IDC connectors and other parts that aren't soldered to the board will need to be ordered separatelyPick Placefolder - contains the locations for all soldered-on parts.
¶ Go to JLCPCB.com
Head over to JLCPCB.com and sign up for an account. Make sure you're logged in (the website logs you out after a remarkably short time, and the “remember me” button doesn't seem to help) then start a Quote.
¶ Start your quote
Use the Add a Gerber File button to upload the PCB design files - CAM_Outputs/PrintNC_GRBLHAL_Breakout_UPLOAD_GERBERS_[xx].zip - This should then show a status bar and process the zip file, which can take a minute or so.
When finished it should say “Detected 4 layer board of 100x100mm,” show a preview of the top and bottom of the PCB without any components populated, and expand the page with more detail and options.
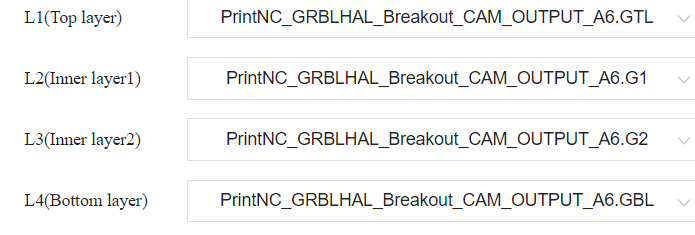
The rest of the options on the first section of this page can be left as default. There should be no need to fill in your layer sequence. If for some reason you can't progress to the next page without filling layer sequence: GTL is top, GBL is bottom, G1 is Inner Layer 1 and G2 is Inner Layer 2.
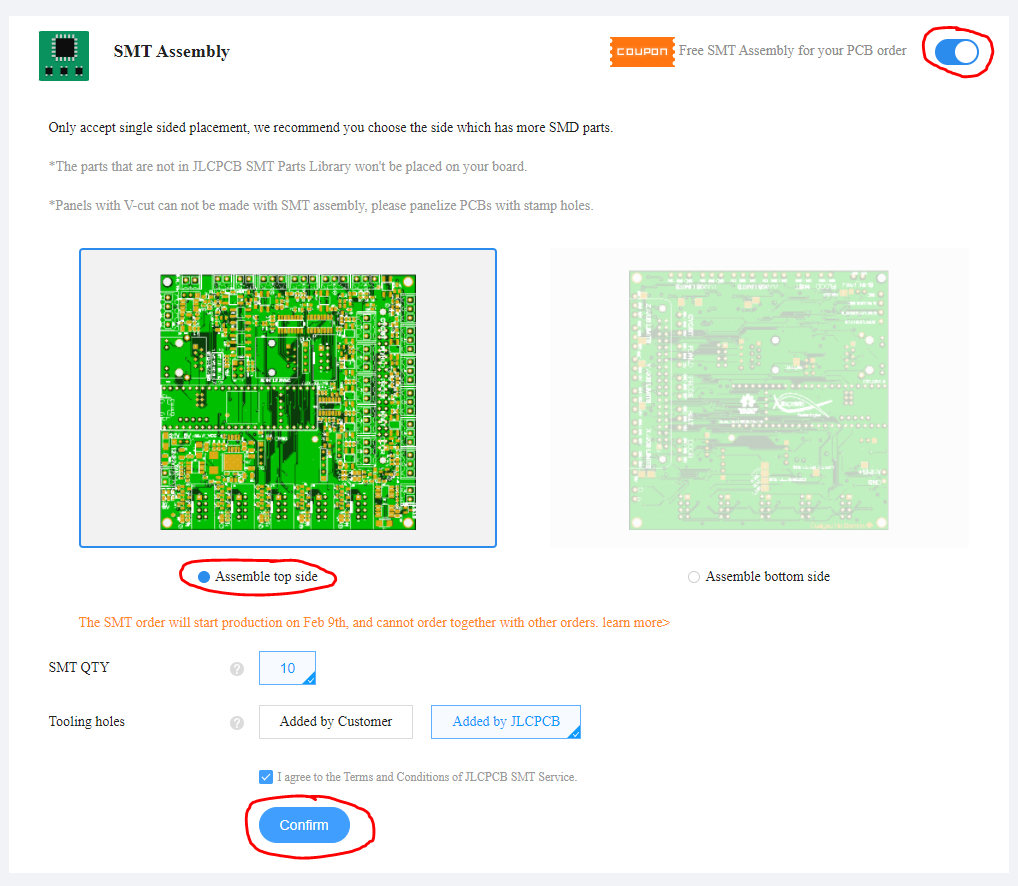
Toggle the “PCB Assembly” button, then check that the top and bottom sides are correct (bottom should show more labels, and have the Expatria Technologies logo), that the “Assemble top side” option is selected, and click “Confirm.” This will do some more processing, and then take you to the “Upload BOM/CPL” page.
¶ Add BOM and CPL
Add your BOM - /BOM/JLPCB BOM-PrintNC_GRBLHAL_Breakout_A5_FULL_ASSEMBLY.xlsx
and CPL File - /Pick Place/PrintNC_GRBLHAL_Breakout_CAM_OUTPUT_A5.csv
then click Next, which will take you to the “Select Parts” page
¶ Select Parts Page
This is the point that things are likely to get a little complicated. Parts shortages can mean you may have one or more components which have a status of Inventory shortage. You will need to search for identical or comparable parts to resolve these shortages before you can get a complete board.
It's also worth checking 2- and 3-pin 3.5mm plugs are in stock from the same manufacturer as the sockets used on the GH2K Main Board and Sensors Breakout. Some people have had issues where plugs from different manufacturers are incompatible despite being the same pitch/type.

For each part that has a shortage, you'll need to understand at least the basics of what the part is and what it does, and then search for a replacement.
Some substitutions for the EST boards can be found at grblHAL2000 Substitutions. If your inventory shortage part isn't listed there, follow the steps below to find an appropriate substitute part.
Please note that the LCSC search/filtering interface is considerably easier to use than JLCPCB. So if you're having trouble finding a substitution it may be worth searching LCSC for the manufacturer part number, navigating to the component type, then filtering the results there.

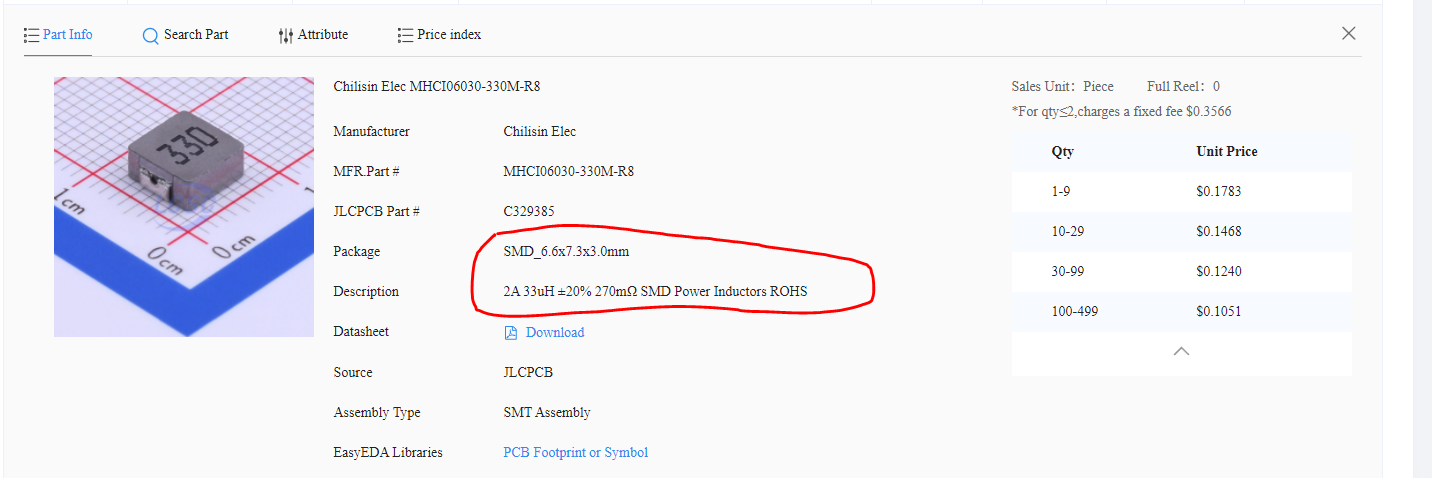
For example, L1 is in shortage. It's a 2A 33uH 270mΩ power inductor. If you click on the part line it will open up more information, which will also show you that it's in an SMD_6.6x7.3x3.0mm package, costing $0.17.
Both the part function and package (size, shape and solder points) need to match for the part swap to be successful. Look at the original part image, and compare it to your replacement part, checking the design and dimensions.
It's also worth checking the cost, as if there's a big difference between the original and your intended replacement, it could be an indication that the parts are substantially different.
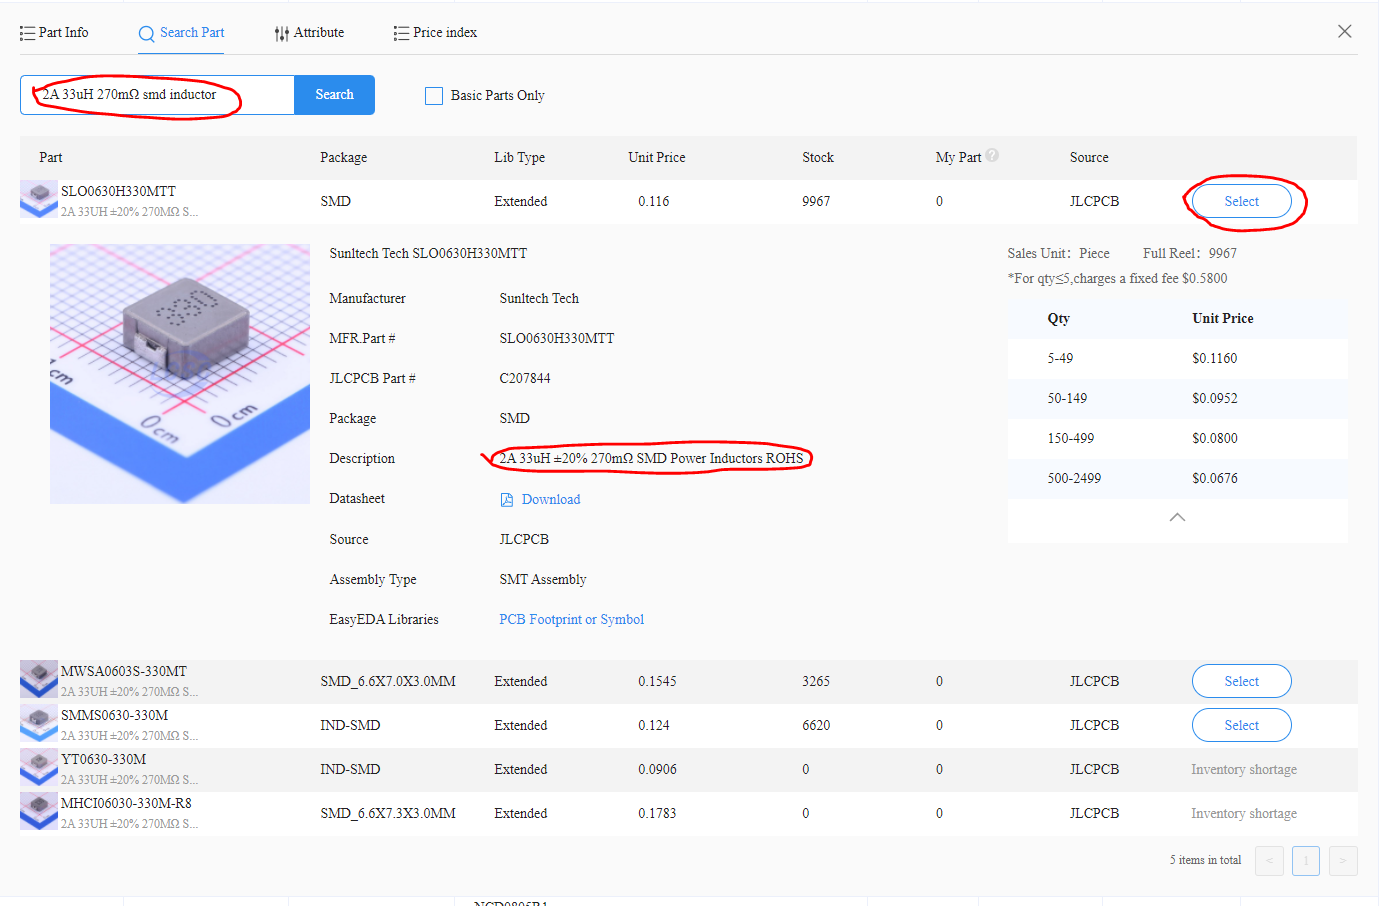
With that information in mind, go to “Search Part” and find yourself a replacement. When searching, you should start by being as specific as possible, and then relaxing your search terms if you're not finding any results.
For this example: If you were to just search “33 uH” you would find hundreds of items, many of which are completely incorrect. "2A 33uH 270mΩ smd inductor" gets us something that looks great. Unit price is similar, plenty of stock, and the description matches perfectly.
Compare your parts, think deeply about how amazing it is we can just use the internet to order tiny scientific miracles to be joined together in arbitrary yet functional formations, and then click “Select” to replace the out-of-stock part.
Note that when you replace your part, the QTY column may update to more than you strictly need for your number of boards. This is because JLCPCB take wastage into account as parts may be dropped when loading a reel or otherwise wasted.

Repeat the parts search process for everything that's showing as Inventory shortage, and in no time at all you will complete your quest to confirm all parts! Click “Next”
¶ Review Part Placement Page
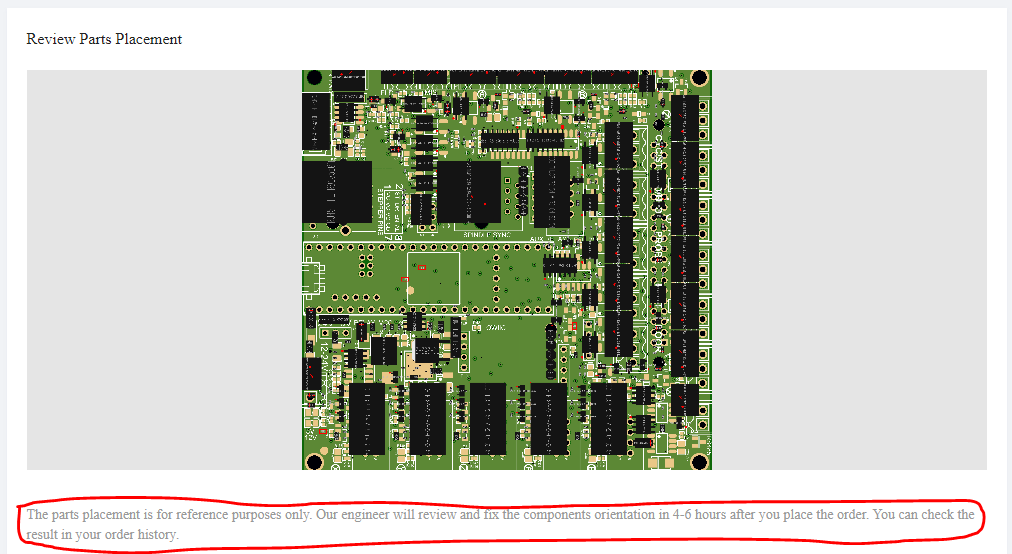
On the following page, you will be presented with an autogenerated part placement preview. This image isn't expected to be accurate (parts may not even appear), and JLCPCB basically tells you to ignore it in the image description text. Unless it looks drastically different than seen below, don't worry about it.
If everything is good, you can click Save To Cart
From the Cart page, if you'd like to order sensor/button breakouts and Jog2K boards (hint: you should order those, they're great) you can click + Add New Item to add additional designs to your order.
¶ Order Breakouts and Jog2K Pendant
Repeat the above process using files from the LIMIT_BREAKOUT and USER_BREAKOUT folders, clicking + Add New Item each time on the Cart page to make a single order with multiple boards.
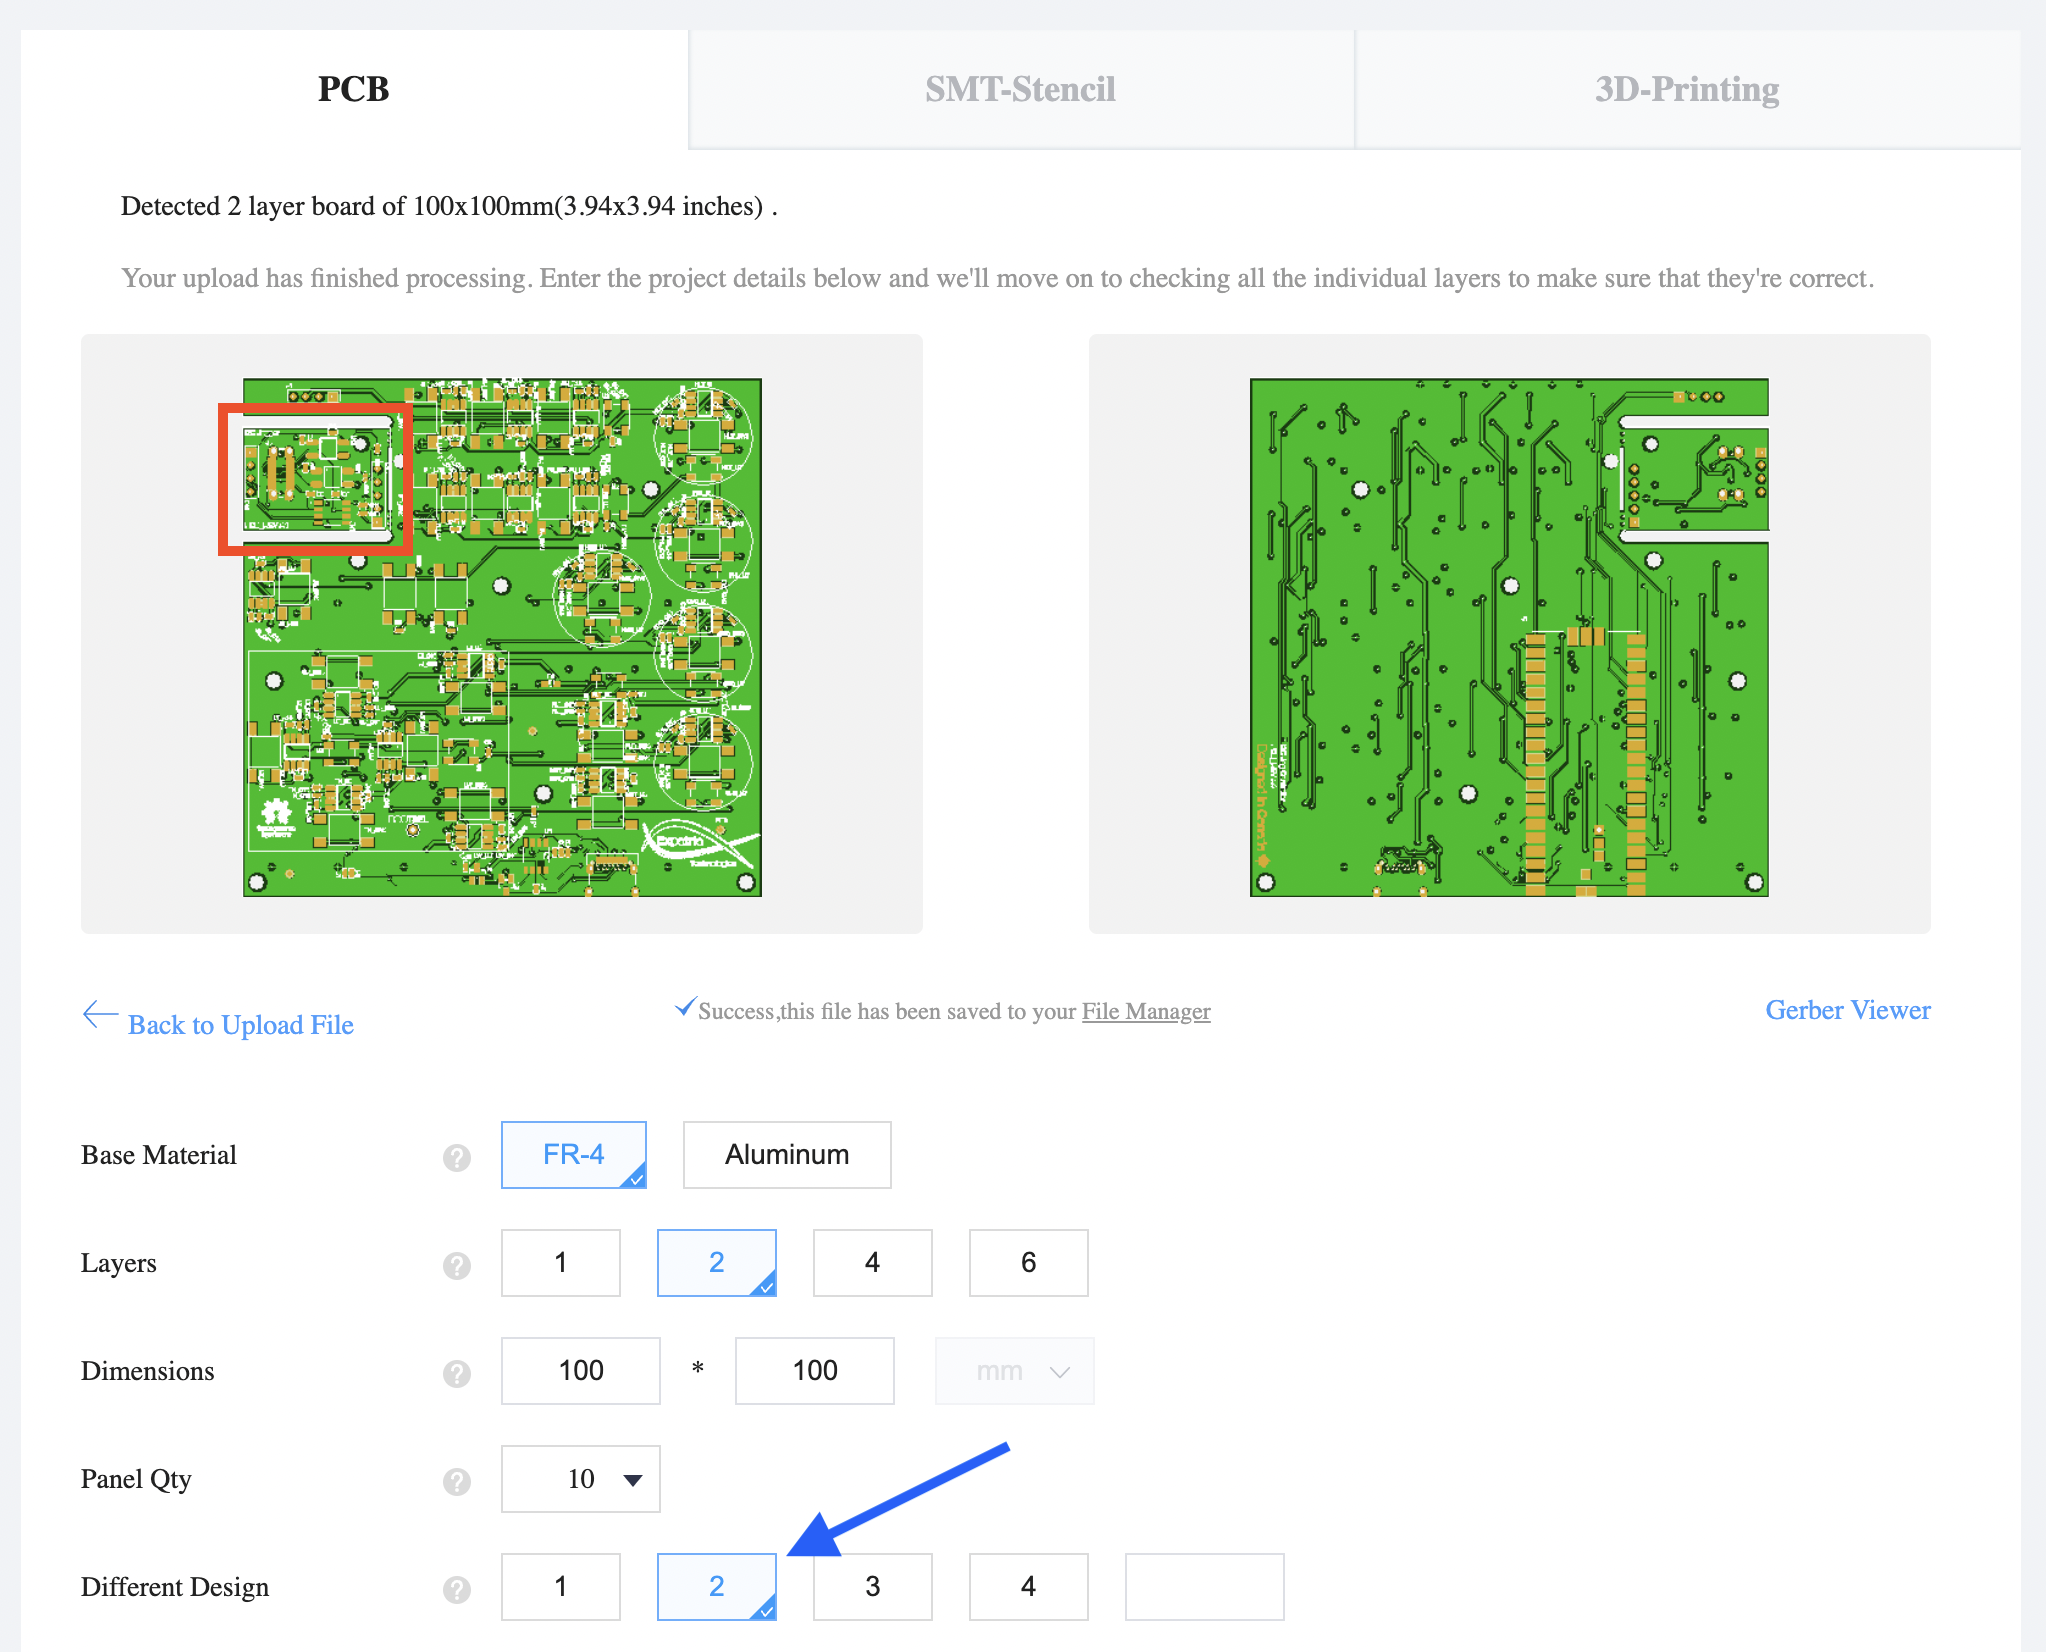
For the Jog2K pendant, get the Zip file from the Jog2K repository on github. The process to add it to your order is the same except for the initial upload page, where you need to set the Different Design option to 2 to account for the small I2C interface module that sits below the OLED screen. This board is snapped off the Jog2K PCB and installed on the 5 and 4 pin QWIIC/I2C headers on the GRBLHAL2000 board.
If you forget to set this option, your order will be delayed and you will need to pay an additional fee to cover the extra board.
¶ Order other necessary components
JLCPCB only assembles components that are soldered to the board, (except for the Teensy 4.1, which they don't stock), so some other components need to be sourced.
LCSC is run by the same company as JLCPCB and has the same stock and part numbers, so it's easy to order from them. Most good electronics suppliers will have the requisite parts (potentially at a price/time premium), so the suggested path is to get everything possible from LCSC, and then other microcontrollers, components and cables from your electronics supplier(s) of choice.
For each board built from the standard BoM you'll need the following addtional parts. If you've changed parts around to avoid inventory shortages, check that your substitute parts are compatible - if you've had to substitute 3.5mm terminal sockets, it's suggested to purchase terminal plugs from the same manufacturer to avoid issues with plugs being too tight or loose.
¶ EST Revision GRBLHAL2000 LCSC Parts
| QTY (per board) |
Description | LCSC Part Number | Purpose |
|---|---|---|---|
| 10 | 3.5mm 3-pin terminal plug | C560213 or C440848 | Limit sensors, sensor breakout, control switches etc. |
| 5 | 3.5mm 2-pin terminal plug | C560212 or C440847 | Flood, mist control, DC in |
| 6 | 2.54mm 8-pin IDC plug | C509255 | Stepper driver signals, aux outputs |
| 2 | 2.54mm 2 pin jumper | C2758457 | Selecting voltages |
| 2 | 2.54mm 40 pin header | C2337 | Teensy main headers (34 pins) and 2x 5 pin jumpers |
¶ Original GRBLHAL2000 LCSC Parts
| QTY (per board) |
Description | LCSC Part Number | Purpose |
|---|---|---|---|
| 15 | 3.5mm 3-pin terminal plug | C560213 | Limit sensors, control switches etc. |
| 5 | 3.5mm 2-pin terminal plug | C560212 | Flood, mist control, etc. |
| 6 | 2.54mm 8-pin IDC plug | C509255 | Stepper driver signals, aux outputs |
| 2 | 2.54mm 2 pin jumper | C2758457 | Selecting voltages |
| 2 | 2.54mm 40 pin header | C2337 | Teensy main headers (34 pins) and 2x 5 pin jumpers |
| 1 | 2mm 2x3 pin header | PZ200V-12-06P | Teensy ethernet headers |
| 1 | 2x20 pin header | C50982 | Raspberry Pi header (optional but may have super cool uses in future) |
¶ Other Suppliers' Parts for GRBLHAL2000 (original or EST revision)
| QTY (per board) |
Description | PJRC | Digikey | Mouser | Element14 | Amazon | Purpose |
|---|---|---|---|---|---|---|---|
| 1 | Teensy 4.1 | TEENSY41 | DEV-16771 | DEV-16771 | Teensy 4.1 | Brains of the operation | |
| ~3m | ribbon cable | MC010M-100-ND | 517-C3302/10 | 2628345 | 100' spool | For IDC connectors. Rainbow cable recommended to make wiring easier |
¶ Jog2K Keypad Pendant Parts
| QTY (per board) |
Description | Amazon | Element14 | AliExpress | Details |
|---|---|---|---|---|---|
| 1 | USB-C Cable | 5m AU$30 | 3-5m AU$15-18 | Must be “USB-C Display” 5GB/s rated - Oculus Link cable recommended | |
| 1 | OLED Screen | TZT OLED | I2C 0.96" 128x64 pixel OLED screen. | ||
| 1 | Rasperry Pi Pico | AU USA |
That's all of the shopping for now. Come hang out in the PrintNC discord and wait patiently until your boards and components arrive. While you're waiting you could also add yourself to the GRBLHAL2000 Marketplace wiki page, so hungry PrintNC builders know where to find you.
¶ Assemble boards
¶ GRBLHAL2000
¶ Jog2K
¶ Flash Firmware
Flash your boards with the latest Expatria firmware release by following the Flashing Firmware procedure.
¶ Test boards
Follow the procedure on Bench Testing grblHAL for each board.
¶ Ship boards