¶ Requirements
If you bought your GRBLHAL2000 Kit from the marketplace, it's likely already flashed with firmware for testing. Check with your supplier if you're not sure.
Most PrintNC users run a 3-axis machine. If you have a 4th axis you will likely need a custom built firmware.
¶ Software
Before you can begin, you will need to install the required tools on your computer. There are different steps required for each OS, so the tasks have been split out below.
¶ Windows
- download Arduino IDE 1.8x for windows here. (scroll down to previous releases) 2.02 is not compatible with Teensyduino. The standalone version is suggested (listed as “zip file”) because it is more self contained and easier to remove if desired. Unzip it to the location of your choice and remember this location as you will need it later.
- Download the Teensyduino installer here, then run it. It should automatically detect where you unzipped the Arduino IDE in the previous step, but if not just point it to the correct place and continue. Install all libraries, and click next until the install is complete.
¶ Mac
- Run
brew install --cask teensy… you'll find an app in your Applications folder called Teensy which you'll use below
¶ Hardware
You will need:
- A Teensy4.1 board
- A DATA CAPABLE microUSB cable (if your board blinks when you plug it in, and stops blinking when you push the button, but you can't load your hex file this is 99.99% the issue)
- Your GRBLHAL2000 board (this is technically only required for testing, you can progress through flashing the Teensy without it)
¶ Flashing Firmware
Now that you have your IDE ready and hardware at hand, you can flash the firmware onto the Teensy.
As of 4/19, the recommendation is to use the Expatria firmware from Github, which supports PWM/analog spindle control and ModBus (for supported VFDs) without any need for recompilation. Please report any issues.
¶ Precompiled Firmwares
| Plugins | VFD | Date | Download | |
| RGB I2C Keypad VFD Spindle |
Analog/PWM; HY, YL, Durapulse via ModBus (see Expatria-Technologies/Plugins_spindle) |
2022/04/13 | Check the Expatria iMXRT1062 Releases page for latest version | |
Once you have the correct firmware downloaded, open the Arduino IDE and connect your Teensy to the computer using the microUSB cable. If you have not previously loaded firmware onto the Teensy you should immediately see a yellow light on the board start blinking at 1 second intervals.
NOTE: Make sure to touch something metal that is grounded to discharge any static that might be built up on your body before touching the Teensy board. A computer case is good as long as it is plugged in, but a door knob or a faucet/tap will work as well.
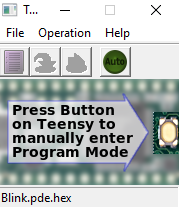
Now, navigate to the location that you unzipped the Arduino IDE to above, and then go to hardware/tools and open teensy.exe . A small window will open like Figure 1. Press the small button on the top of the Teensy.

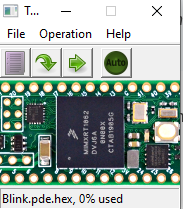
After doing this the light should stop blinking, and the Teensy loader window should change and look like Figure 2.

Click “Open HEX File” (The far left button that looks like a page with text) and then find and select the HEX file that you downloaded from Github above. You should now see the name of the hex file along the bottom of the window. Click “Program” and wait for the bootloader to update. After that is finished you should see a message saying “Download Complete”, now press the “Reboot” button and wait for a message that says “Reboot Complete." You are now done flashing your firmware and can move on to soldering the Teensy to the GRBLHAL2000 board and testing.