¶ ON/OFF Circuit
The On/Off switch. It sounds very simple, it is just a switch. But is it really? From a safety perspective, a mechanical switch is usually not the best alternative on any machine that can move by itself. This is because it does not fulfill one of the basic safety conditions, that a machine never should be able to start unexpectedly and cause a dangerous situation after a cable is plugged in, a power loss is restored etc.
In the standards document IEC 60204-1 ("Safety of machinery") we read:
- Upon restoration of the voltage or upon switching on the incoming supply, automatic or unexpected restarting of the machine shall be prevented where such a restart can cause a hazardous situation.
Self holding relay circuit
The easiest way to implement a safe On/Off switch in our relatively simple machines is to make use of a self holding relay circuit, where you use momentary push buttons to turn the machine on and off and the relay is what saves the state. This kind of circuit is only stable with power on, so if you get a power loss of any kind, the machine will revert back to its "off" state, requiring the active decision to press "on" for the machine to be energized.
¶ End stop Sensors / Limit switches / Homing
Content has been moved to a page dedicated to this topic which can be found here: https://wiki.printnc.info/en/electronics/endstops
¶ Emergency Stop
An Emergency Stop is a safety mechanism used to shut off machinery in an emergency. Unlike a normal shut-down switch or shut-down procedure, which shuts down all systems in order and turns off the machine without damage, an Emergency Stop is designed and configured to abort the operation as quickly as possible, and to be operated simply and quickly (so that even a panicked operator or a by-stander can activate it).
An Emergency Stop should never be dependent on your control software working properly. It is a good idea to also trigger a e-stop in your controller simultaneously, but this can not be the only method to achieve safety. You can have a large array of faults, and physically disconnecting power also removes danger from most electrical faults as well.
The requirements for the emergency stop function as stipulated in IEC 60204-1 ("Safety of machinery") are as follows:
- The emergency stop function must have priority over and deactivate all other functions and operation in any mode.
- The power supply for all machines that are capable of inducing a dangerous condition must be removed as quickly as possible without causing any other dangers.
- The reset function must not restart the stopped machine.
There is also a requirement for the placement of the E-Stop buttons:
- Emergency stop equipment must be located at each operator control station and at other locations where the initiation of an emergency stop can be required.
- Emergency stop equipment must be placed where operators can see and access them easily and can operate them without exposure to hazards.
¶ Rule of thumb about E-Stop button placement
These rules about placement can be cooked down to a rule of thumb called "Within arms reach". Imagine yourself getting stuck point around the machine. Can you reach the emergency stop? If not, you might want to look into a secondary emergency stop button. At the same time, you want to avoid to place E-Stop buttons where they might interfere with the regular operation of the machine, so in the case of the PNC, the width of the working area and the
¶ Q - What is the different between these two items?
This is a (latching) safety switch:
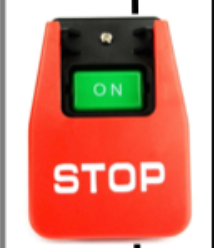
In a PrintNC setup this may be used as your “master power on/off”. Think of it as energizing the shop at the start of the day and making sure power is off to everything in the PrintNC world at the end of the day. The switch should be latching meaning that it has a magnetic function that will trip if power is lost and it will STAY OFF when power is restored - until such time as you push the “ON” button again. This avoids any risk of your machine re-energizing on a power restore event and making sudden movements or turning the spindle back on unexpectedly. Note: There are switches sold for this purpose (including a router table switch from Lee Valley) that are NOT LATCHING. Make sure you have a latching safety switch.
This is an emergency stop (e-stop) button or switch:
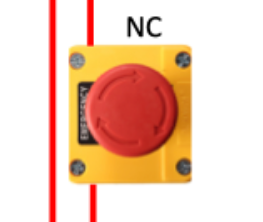
An emergency stop switch should be wired so that it cuts power to the motion control portion of your CNC as well as your spindle or router (if using a separate router like a Makita). This button should be placed within easy reach of where you normally operate your machine. It should be large, brightly coloured and easy to reach at all times. If you start a job and realize you are about to collide with something (like a vise or something you accidentally left on the table) you hit this and it cuts power to the machine and sends and, if wired to do so, an alarm to your control software. These switches are typically of the plunger type and have a twist-to-release mechanism to unlock them after they are triggered.
NOTE: You should never operate your machine CNC unattended. All CNC machines are fast, powerful and depend on many different interacting mechanical and electrical systems to operate properly. In addition, mechanical surprises like a bit coming loose in a collet due to dust, insufficient tightening or a failed motor on an axis, can happen unexpectedly. These events can have serious consequences if not detected and addressed immediately. As the machine operator you should be near the machine with a sightline and within hearing distance at all times. Often sound is the first indication something is going wrong.
In addition, when cutting flammable materials like wood, a jammed bit can quickly produce massive friction and lead to smoke and fire if not addressed immediately. While running a known job over and over may seem “safer”, do not confuse familiarity with safety. Repeating a successful job really only validates the Gcode as good and does not eliminate or reduce any of the other inherent failure or safety risks in operating your CNC. Practice safety first.
Always make sure you are within reasonable reach of your e-stop button when the machine is running. Basic CNC safety means wearing appropriate eye, ear, and respiratory protection and have a fire extinguisher available and accessible. If you accidentally scorch a workpiece with your bit remember that scorched wood bits could be drawn up the vacuum hose and in to the vacuum bucket. The vacuum bucket should be inspected and confirmed safe before continuing. Also, the additional airflow of the vacuum can turn a smoldering handful of scorched chips in to red embers that ignite a dust fire.
¶ Q - Could somebody Confirm If this is the right Contactor for the E-stop Circuit?
Im not sure if I need Normally Open or Normally Closed? https://www.amazon.com/Siemens-3RT20161BB41-Contactor-3-Pole-TERMINAL/dp/B003U6615Y/ref=sr_1_9?dchild=1&keywords=siemens+contactor&qid=1624686237&sr=8-9
Logan: NO is for your holding circuit. you run your coil though the NO in parallel with the start button and in series with your stop. Yes, NO is correct.
¶ Q - What rating do I need on my contactor?
Logan: For contractor motor loads, amp rating doesn't matter. HP rating matters. If it doesn't have one it's not for motors. Needs to be rated for 3HP ideally, though you'll probably never have that much power going to your spindle
¶ Q - You make an excellent point about the cabinet not being opened until the power is off. How are you going to achieve that?
ldc79T: basically when you open the cabinet you turn a switch off. I'm not sure I will integrate this feature, I guess I will have all my 220V cables not exposed. I will use a plexiglass sheet with only one hole for the circuit breaker and everything else will be under the plexi. If I need to access something I will cut the power with the breaker and then I just have to unscrew some screws.
¶ Q - Can I leave the machine unattended? I am not going to stand there for a long job, I have stuff to do. Or I can let it run overnight, right?
No you should never leave your machine unattended and especially not if you are operating it at home. You are the machine operator. Under no circumstances should you let it run unattended overnight.
If you have an especially long job, break it down in to multiple toolpaths with manageable machining times so you can pause between toolpaths for bathroom breaks or shut things off for extended periods and pick up at a later time. If you have a single massive toolpath (for example a large complex carving) you can use containment boundaries to physically limit the area of the toolpath so it can be broken down in to reasonable chunks of time to allow for breaks.
Here is a must watch 4 minute video of a CNC job gone wrong and starting a fire. This is a much smaller and much less powerful machine than the PrintNC. You can reasonably assume that a similar event during this job on a PrintNC would escalate even faster.
¶ Electronics Enclosures
¶ Q – What size enclosure would you recommend?
Logan: I used a 12x12x6 but it's really tight. I would suggest a 24x24x8 as a minimum if you want room to work.
¶ Q – I’m not sure where to start with my electronics cabinet, is there a general example to give me some ideas?
Some people use industrial electronics or project boxes, and others build out of wood or repurpose an old PC or server case.
@kjordan 🇨🇦:
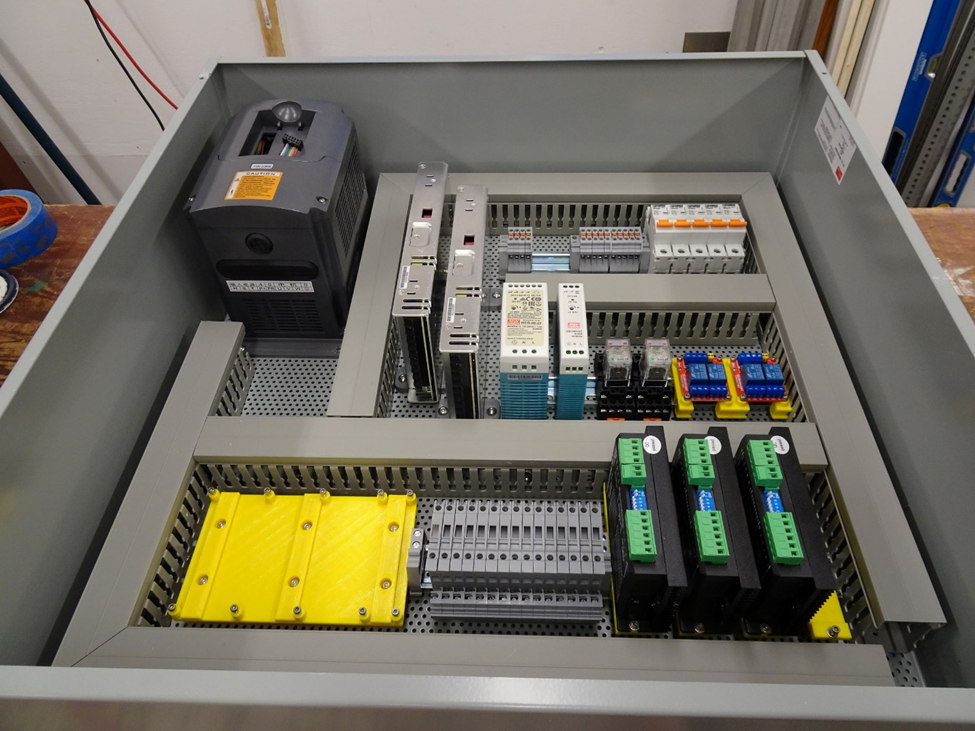
"Started work on the electronics enclosure the past couple of days. This is a 24 x 24 x 8" Hoffman cabinet with a mesh back plate. Thought the enclosure would be too big - guess again! Two 36VDC power supplies, so two steppers on each one. 24VDC power supply for I/O and stop/start relay. 5VDC power supply for the Mesa 7i76e (the mount for it is in the lower left) and Ethernet switch. Still waiting for another stepper driver and hook up wire to arrive. Am going to replace the two dual relay boards with a single four relay board (24VDC.) Need to order some more double high fused terminal blocks and work on the enclosure. Used 1M of DIN rail and about 3M of wire duct.
The 8" deep cabinet gives room for the VFD to be inside, but doesn't leave too much room above it for clearance."
@Logan noted: The VFD is supposed to have 50mm minimum clearance around it according to the manual
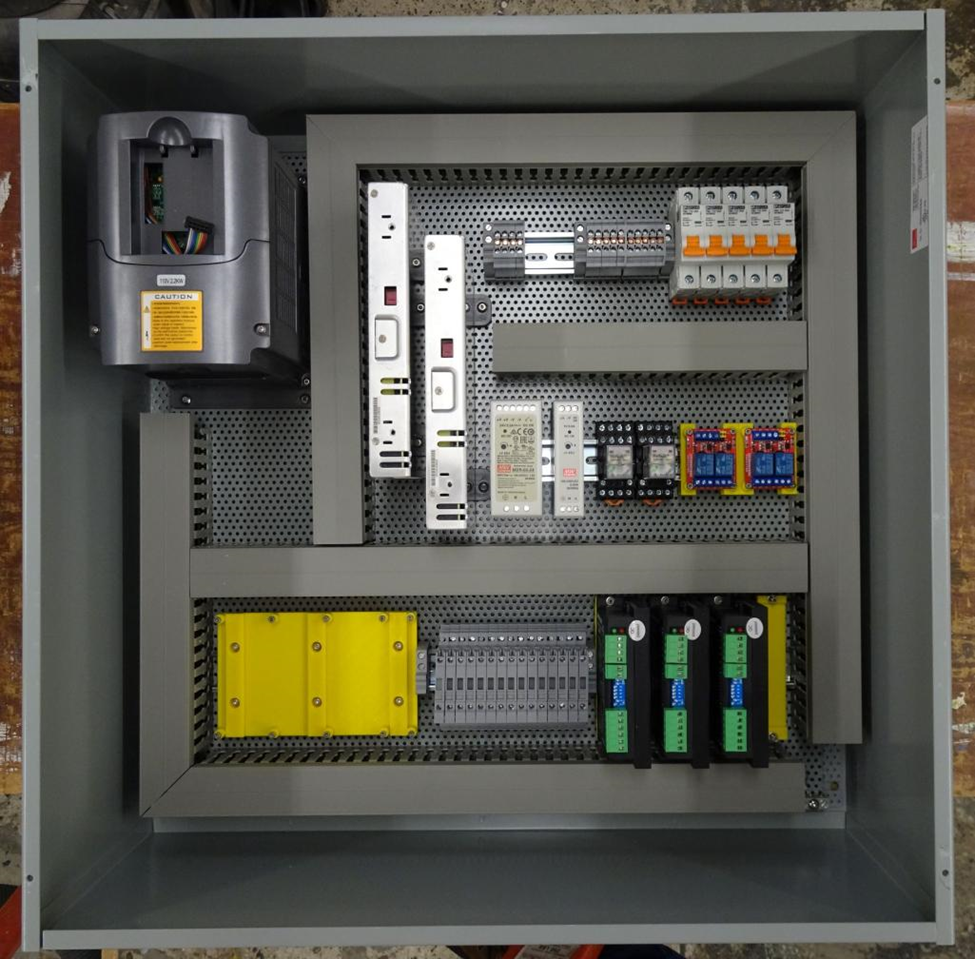
"Ran out of DIN rail space so Netgear Ethernet switch is going to sit on the bottom of the cabinet. Will most likely make up some kind of mount for the Intel NUC so it is positioned near the front cover so I can drill a hole to press it's power switch. Have a 120mm fan to mount to the top of the enclosure. Need to make some air exhaust vents, too. Going to be a 2" grommet on the lower right side for the limit switch and stepper cables."
Projects by Brian has a good video walking you through the contents of his PrintNC electronics in a Dell server case here on YouTube:
Community member Mishkan shared some details of his build (in an interesting clear front cabinet):
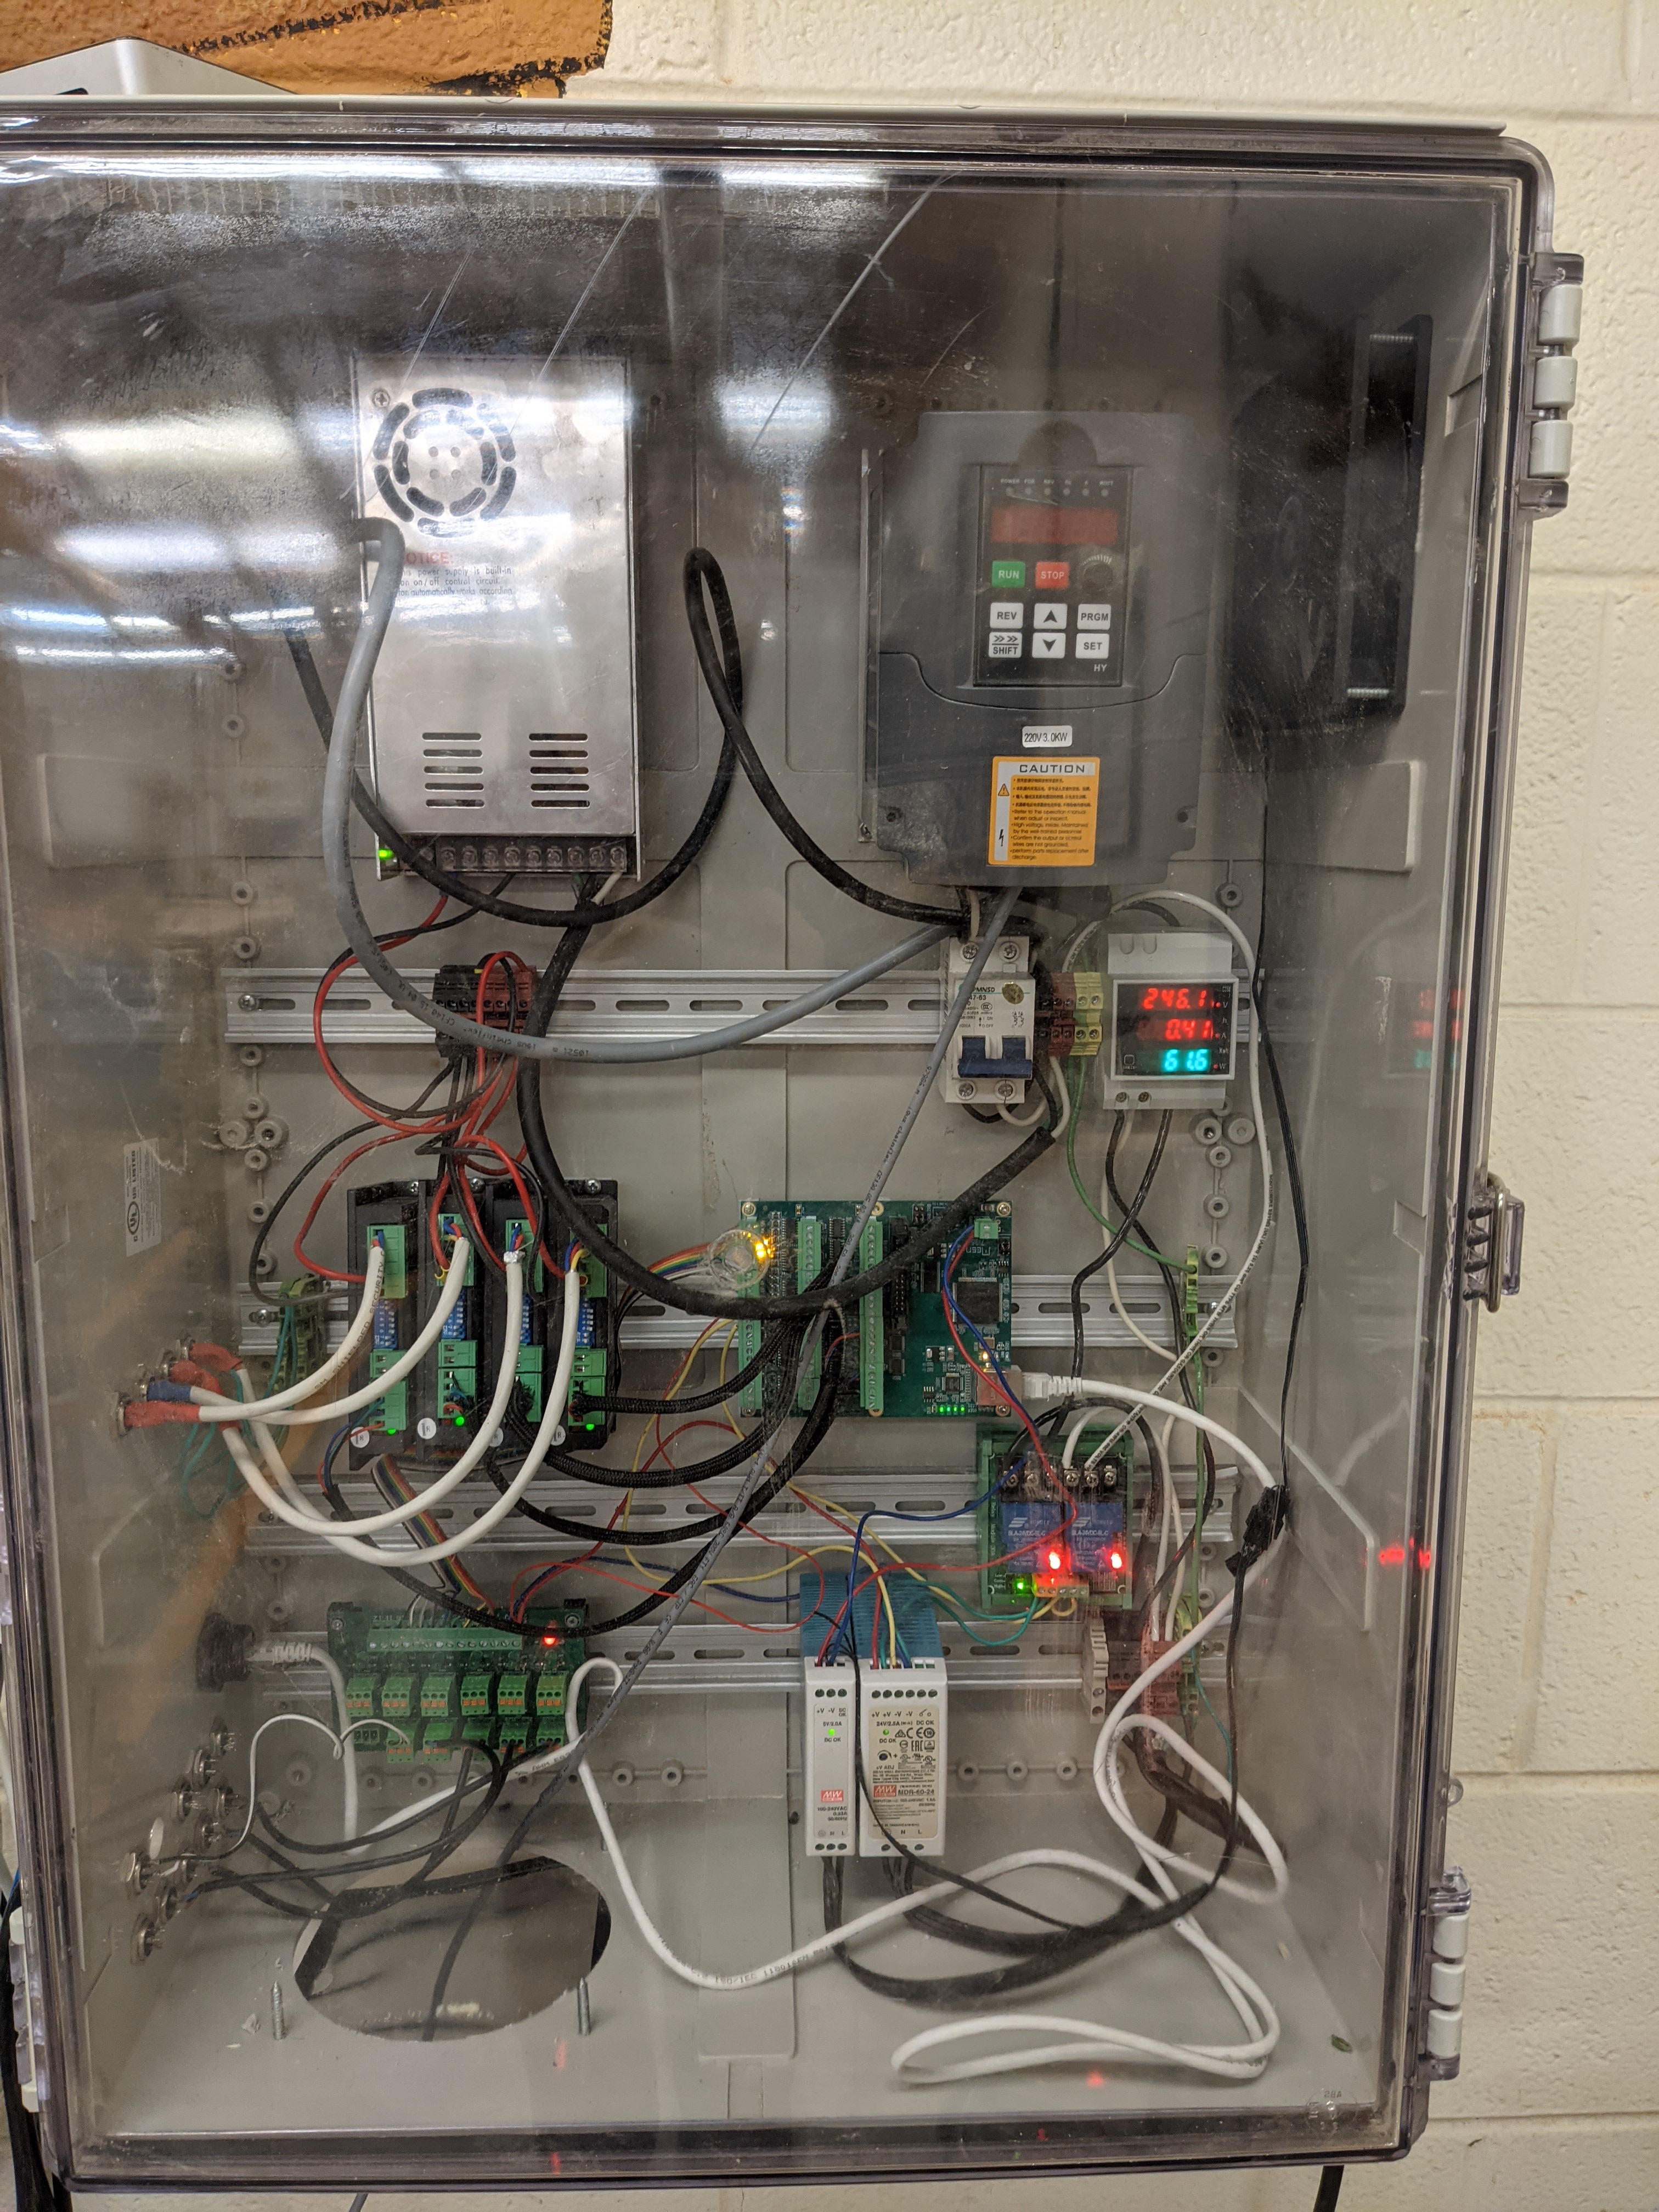
https://www.amazon.com/dp/B005T94A08?ref=ppx_pop_mob_ap_share
Mishkan: Clear cover just means I can't be lazy with my wiring. That's the digital voltage readout for the vfd and steppers, it's nice to have, realize how close I am to some of the limits
I got a really good deal on this https://www.amazon.com/dp/B005T94A08?ref=ppx_pop_mob_ap_share - $73 brand new, I assume it was an error
Trader: Lets see if I learned anything in the last two weeks... So I see a PSU, VFD, Stepper Drivers, Mesa, Contactor, Voltage readout, relays... what are the items across the bottom row/rail?
Mishkan: So bottom left is my npn sensor breakout board, keeps my wiring cleaner. Then some din rail power supplies for the mesa (5v) and 24v for sensors/relays. Then my mains voltage breakout on the right side
Trader: Is your sensor breakout just a passive board for convenience or does it have noise isolation etc?
Mishkan: Amazon, Convenience
US $24.98 | PLC12 channel NPN input spring wiring IO photoelectric proximity switch sensor terminal block.
https://a.aliexpress.com/_mMRlTUz
Mishkan: Yeah I have a pnp one as well, actually if people are interested
Trader: Well that is an interesting idea. So you can bring your power and GND to it once and draw off all the signals in one spot. So it is passive, there are no optocouplers here, is that right?
Mishkan: Yeah, the mesa cards and any good BoB should have something
Trader:So you are Mesa with NPN NC prox switches? That's what I ordered before I finalized on the Mesa but I thought PNP were recommended or do they both work?
Mishkan: Both work. Which mesa?
Trader: 7i96
Mishkan: Yeah that's mine. Also I don't know if you need pull up resistors so this saves some effort as well.
Trader: So you are using a 7i96 and NPN NC sensors with no pullup resistors and they work fine? or does this cause pull up?
Mishkan: I think this does, sorry, I'm not the best with electronics. I let out magic smoke earlier when I tried to see if my fans could handle 24v. Spoiler, they cant. I think the Mesa may have an internal pull up actually. One sec.
Logan: looks like the LED circuit would act as a pull up resistor when the output is floating
Mishkan: The 7i96 might have an internal pull up as well
Honestly it works so ¯_( ツ)_/¯. Lost an arm there
Nc/no doesn't matter wiring wise, you just want nc to catch failures if possible
Logan: my understanding is the mesa needs either pnp or pullup resistors.
Mishkan: I think that's the 7i76e. The 7i96: “All 11 Isolated inputs have a common pin. This common pin must be connected to ground for active high inputs and connected to the I/O power for active low inputs.”
Trader: Ah ok so as long as you use the same power feed it works without the pull up - sweet!
Mishkan: Yeah just looked at the 7i76e manual, that one is sinking only
Trader: So it sounds like you loop the power output from an output pin back to the common pin and you're all set. Well that makes the 7i96 even a bit more interesting
Mishkan: Yeah the 24v+ goes to my pin 12 (the common pin)
Trader: Brilliant. So the the lines in and out of your mesa are: 5V for board power, 24V supply power for steppers (?), Signal lines from sensor breakout board, +/- drive signals for steppers, And something to the relays?
Mishkan: 5v only for mesa power, Drivers run off 5v signals, Relay is 24v, I run 24v- through the mesa and into the relay, I haven't hooked up my estops properly yet, But that same 24v- will go through all my nc estops
Trader: Do you happen to have a wiring diagram or spreadsheet or anything that shows it or did you wire on the fly?
Mishkan: On the fly
¶ Q – What is the part number for @Mishkan’s dual relay board?
Mishkan: sla-24vdc-sl-c
¶ Q – What kind of specs should I look for in a contactor for my safety setup with the electronics?
@logan: for a contactor, go big. It doesn't hurt anything to have more capacity than you're using. 25 or 30A minimum, and motor rated.
@logan: “NOT this one https://www.amazon.ca/Household-Contactor-220V-Mount-Replacement/dp/B07RYQRNCR/”
¶ Q – What about a 110V contactor if you’re using the Cisco PSU?
"Bob": Yea, that is what I have been looking for. I see one that is 63a LOL
Logan: yep, contactor kills power to the VFD and Cisco. yeah, don't use an AC breaker for DC. it just won't trip. Same with fuses, just not reliable.
m0jo: use "solar panel" in your search, it will get the DC breakers. DC breaker also have a direction, when you wire them up, lookup the symbol on it, the load and source need to be on the correct terminal
"Bob": the hard part is finding a dual switch 10a… DID I WIN?!? https://www.amazon.com/LANGIR-Photovoltaic-Polarized-Circuit-Certificates/dp/B012MWNSV6/ref=sr_1_33?dchild=1&keywords=din+dc+10a+circuit+breaker&qid=1611030096&sr=8-33 - damn, not prime. So is a 20a breaker 20 for each side or 20 total 10/10?
m0jo: 20/20. If you got the normal cisco psu, you can use 2 single pole breaker
Logan: you don't need them ganged together either. just make sure you put XZ on one and Y1Y2 on the other so you don't rack your gantry if one trips. But honestly I'd trust fuses more than rando no brando breakers from china.
m0j0: You can also grab a 6a breaker to power fans and other small stuff from the 12v on the psu
"Bob": and I would also need the 110v contactor relay?
Logan: depends what you use as a estop. My estop has a built in latching function, so I didn't need to make the contactor latching through a NO contact
"Bob": I was using this on my last machine https://www.amazon.com/gp/product/B00KPEEPAW/ref=ppx_yo_dt_b_asin_title_o01_s00?ie=UTF8&psc=1 - But I have the same buttons as Redux has on his list https://www.amazon.com/dp/B07WTL3KPB/?coliid=I3UYZPVWWZA5EP&colid=2WFJGIOPUXFH6&psc=1&ref_=lv_vv_lig_dp_it
And these https://www.amazon.com/dp/B083VWY28M/?coliid=I3UO120QY12U4B&colid=2WFJGIOPUXFH6&psc=1&ref_=lv_vv_lig_dp_it or a cheaper recommended route?
Logan: The paddle you already have is latching correct? You can hear it go "thump" when you turn it on?
"Bob": more like a click
Logan: if you unplug it when the switch is on, does it turn off when you plug it back in?
"Bob": Not that I ever noticed. Let me check
"If the power goes off while the saw is running, does the tool stay off after the power is restored?
Answer:This safety off switch, does NOT do what your question is about. "
Logan: This one does. https://www.amazon.com/Woodstock-D4159-220-Volt-Paddle-Switch/dp/B005W17HSA/
Magnetic feature prevents tools from unexpectedly powering up after a power interruption
Logan: so that can be used instead of a latching loop on the contactor, because if power is lost, the switch latch opens. It's a simpler way to do the same thing.
For the latching to work you have to run both neutral and 120V to the switch, or both legs of the 220V.
¶ Q – Do I need a cooling fan in my electronics enclosure?
Yes, you should plan fans for two to cover for a situation where one of them fails. People have found that large 12V PC case cooling fans work well. You may want to consider an air filter element in your design.
¶ Q - If I'm not running a VFD is the contactor etc still appropriate/necessary?
Logan: It's not a bad idea. If you want to be able to kill power to your router, steppers and vacuum all at once if you start a fire.
There is machine e-stop which may stop motors and may or may not stop the router. Then there is cut all the power to the PSU, router, Vacuum, motors, everything. Both are desired and recommended.
¶ Q – Is there a BOM anywhere for the electronics cabinet builds as a starting point?
kjordan: Here are the cabinet parts - all Hoffman: ASE24X24X8NK - Screw-Cover Type 1 Pull Boxes without Knockouts
PB2424PP - Type 1 Pull Box Perforated Panel. Got the cabinet for CDN$155 and another CDN$50 for the perforated panel from electrical wholesaler I deal with from work.
Go right ahead. Will see if I can dig out the list of stuff I bought from Digi-key - this would be the circuit breakers, power supplies, terminal blocks, DIN rail, and the wire ducting. The 24VDC 4-pole relays and the two little dual 24VDC relay modules from Amazon. Give me a bit to dig out the Digi-Key part numbers. One of the breakers was supposed to be 20A - they gave me a 25A (for the VFD). Rest are 5A. Have the hardware on hand to install a 120V/30A circuit for the machine.
Here is a list of parts and part numbers where available:
Ground Bar: Siemens ECGB10 (Amazon) (Have one at the bottom, getting a second one to put by the VFD for VFD and DC power supply grounding)
4 Pole relay with DIN base - TWTADE YJ4N-GS 24vdc (Amazon)
Mean Well LRS-350-36 Power Supply (36V/9.7A)
Mean Well MDR-60-24 Power Supply (24V/2.5A)
Mean Well MDR-20-5 Power Supply (5V/3A)
Wire Duct - Digi-Key 277-5403-ND
DIN Rail - Digi-Key 1920-1125-ND
Dual Level Fused Terminal Block - Digi-Key 1920-1265-ND
Side Plate for above (not in stock, have yet to order) - Digi-Key EPDDFL4U-ND
Terminal Block - Digi-Key 1920-1235-ND
Terminal Block Side Plate - Digi-Key 1920-1264-ND
Center Jumpers for Terminal Block - Digi-Key 1920-1275-ND
Terminal Block End - Digi-Key 1920-1243-ND
20A Breaker - Digi-Key 277-17826-ND
5A Breaker - Digi-Key 277-17817-ND
Fuses - 5x20mm, get ratings as you need:
250mA for power to field input devices - Digi-Key 283-3262-ND
1A for powering things - Digi-Key 486-1782-ND
Side Jumper for the Dual Level Fused Terminal Block - Digi-Key 1920-1285-NDAm using the side jumpers to jumper the 24VDC on the top/fused side of the fused terminal blocks - power going to the limit switches. Lower level will be the return from the limit switches to the Mesa card.
Not cheap, though!
Trader: Safety and doing it right rarely come cheap
kjordan: Yep, that is why I never bought the breakers from Amazon. These breakers and terminal blocks have the proper certifications. 24VDC stuff am not so concerned with...