¶ Summary
Create 4 M6 threaded holes on the top. Create 4 6.5 mm unthreaded holes on the bottom side and mount the HGW20 block to bottom side.
¶ Prep
¶ Hardware Needed:
- center punch
- drill
- 3 mm Drill bit (optional for pilot holes)
- 5 mm Drill bit
- 6.5 mm Drill bit
- M6 Tap bit
- (2) Y-Axis roller beams - 70 mm
- (2) HGW20 Block
- (8) M6x12mm Button Head Bolt
- Thread-locking fluid
- (Optional) Pencil
¶ Printed Parts Needed
- Assembly Tool #4 - Y Roller Bottom
- Assembly Tool #5 - Y Roller Top
¶ When complete, verify
- You have (2) assembled Y-Axis roller beams.
- Each assembly has a HGW20 block attached to the bottom with (4) M6 bolts.
- Each assembly has (4) M6 threaded holes on the top surface.
- Each HGW20 block has one grease fitting mounted
¶ Build Steps:
- Linear rail blocks ship from factory with just rust prevention oil on them. Before using them you will need to prepare them for use and lube them correctly:
1.1. Verifying blocks have clean guide edges - free from any debris or manufactoring leftovers.
1.2. Lubricating them correctly - follow your manufacturer instructions on how to deep clean your linear rail blocks and apply lube. If your blocks have a lube port, you can choose to skip deep cleaning and instead just use a lube gun to force the oil out and apply lube.
Video on how to Tune Up Linear Bearings before usage.
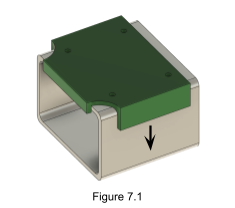
- (Optional) Mark the side of the beam with an arrow pointing up to ensure you don’t lose orientation of the beam. All figures in this section will be marked so for ease of interpreting.
- Position Assembly Tool #4 on the bottom face of the Y-Axis frame beam with the number on the printed part facing the beam and all tabs securely holding position as shown in Figure 7.1.
- Mark all holes with a center punch.
- Drill the marked points with a 6.5 mm drill bit.
- Position Assembly Tool #5 on the top face of one Y-Axis frame beam with the number on the printed part facing the beam and all tabs securely holding position as shown in Figure 7.2.
- Mark all holes with a center punch.
- Drill the marked points with a 5 mm drill bit. (optional: drill with 3mm drill bit, check if holes are in alignment before drilling the 5 mm holes)
- Thread all holes made in the previous step with an M6 tap bit.
- Mount the HGW20 block to the bottom of the beam using the M6x12mm button head bolts as shown in Figure 7.3. Once you have every thing aligned, take it apart and use thread lock. (Note: The button head screws are not included with the Hengli kit, but the 6x20mm socket head cap screws can be used here instead.)
- Remove the bolt in the top middle of the HGW20 on one side and add the grease fitting.