¶ Setting up and Tweaking your Debian Linux OS for your PrintNC/LinuxCNC install
¶ This page will attempt to answer the common questions, both basic and advanced, that come up regularly on the PrintNC Discord channel.
¶ The only stupid question is the question you don't ask, so if you need help with something, please speak up. All I ask is that if someone helps you, you take the time to document what worked and help expand this page so the next person to come after you has a smoother journey and we can all help grow the community. -Trader
¶ Q - Is it just me or is Linux infuriating?
It's not just you. I've been using Unix/Linux fairly regularly for almost 25 years in my professional and personal life and it can still raise my blood pressure - usually when I wander in to a new area I'm not familiar with. Even seasoned veterans can be stumped at times. Have patience though, the juice is worth the squeeze. It's no different than getting a new tool in the shop - don't expect to be an expert the first time you use the tool, building skills takes time.
Linux is a fickle mistress and can be especially confusing for new users and users who aren't used to poking around under the hood of their computers - but don't let that stop you from diving in. You do not need any significant experience in order to get Linux installed and working for the PrintNC/LinuxCNC build. We'll do our best here to demystify things.
¶ Q - I want to learn the real basics of how to get around at the command line (NOTE: Not strictly necessary for LinuxCNC but probably not a bad idea), where can I get more information?
The real basic meat of linux is common to almost all distributions so any intro to linux resources will help, but the RaspberryPi foundation has done some great work on explaining the basics. Conveniently, the “Raspbian” operating system that they use is a branch of the Debian operating system used in the regular LinuxCNC install, so any of the non-Pi specific commands will translate directly to your Linux CNC machine.
For details on basic commands for changing the directory you are in, listing files, moving and copying files and so forth, please see: https://www.raspberrypi.org/documentation/linux/usage/commands.md
¶ Q - Is there a way to get the old “eth0” style network interfaces names back? (LinuxCNC Debian Buster OS or Debian Wheezy OS)
Yes, I hate the new naming conventions too as they make it very easy to make a typo, break your network and not be able to easily spot it on the screen.
If you would like your interfaces to be eth0 and wlan0, the fix is quite easy:
Open a terminal window and then open your /etc/default/grub file via sudo:
sudo nano /etc/default/grubWithin that file, find the line that starts with GRUB_CMDLINE_LINUX_DEFAULT=
This line contains the parameters that are passed to the kernel at boot time and can be used to do lots of things. We're going to tell it to use the previous interface naming scheme. Add net.ifnames=0 to the end of your line before the closing quote marks (leave any other entries in place, order doesn't really matter, but spaces between entries do matter and note the period in the variable name - some kernel parameters have periods, dashes, colons or underscores and these matter):
GRUB_CMDLINE_LINUX_DEFAULT="quiet net.ifnames=0"Now save the file by using CTRL-X and answer “yes” when asked to confirm that you want to save.
** NOTE - Changes to the /etc/default/grub file DO NOT APPLY unless you run this additional command when done:
sudo update-grubThis will scan your system for available kernels, and update your boot files. Now you can reboot and your machine will have the more readable “eth0” and “wlan0” interface names.
¶ Q - How do I set a static IP address on my ethernet or wireless LAN (wlan) interface(s), I need to configure it for my Mesa 7i96 or similar?
While there is a graphical network configuration tool called Wicd included in the Debian install for LinuxCNC, it is kind of inflexible and doesn't handle the situation many PrintNC users have - using a dedicated NIC for Mesa 7i96 communications while having a second NIC or WiFi interface for internet access.
The easiest way around this is to hard code your Mesa IP address and use either DHCP or a static IP address on your Wifi.
I recommend you revert your interface names to the classic eth0 and wlan0 as detailed in “Q - Is there a way to get the old “eth0” style interfaces names back?”. If you haven't or don't want to, just adjust the interface names below to suit your local system, being extra careful not to make a typo in the interface names.
Open a terminal window and use the nano text editor to edit the /etc/network/interfaces file:
sudo nano /etc/network/interfacesAssuming you already made the kernel change above and rebooted, you can basically copy this text in and adjust it for your situation:
# This file describes the network interfaces available on your system
# and how to activate them. For more information, see interfaces(5).

source /etc/network/interfaces.d/*

# The loopback network interface
auto lo
iface lo inet loopback

# The primary network interface
# Note, if you didn't revert to classic interface names, replace eth0 with
# the odd string specific to your machine for example: enp2s0

# Set the recommended static IP address to talk to the Mesa family of cards
# Note, you do not want a gateway on this network, not required or recommended
# The 'auto' statement tells it to bring the interface up at boot
auto eth0
iface eth0 inet static
       address 10.10.10.2/24

# Added by YOUR Initials TODAY, 2021
# Always a good idea to note when you poke files, leave breadcrumbs for yourself
# Example from Q&A here: https://wiki.printnc.info/e/en/controllers/linuxcnc
allow-hotplug wlan0
iface wlan0 inet dhcp
       wpa-ssid YourWifiSSIDHere
wpa-psk YourPasswordHereUse CTRL-X to save the file (confirm yes, and the filename). (Note: If you get an error with a red banner and something about permissions when you go to save the file, then you forgot to put sudo at the front of the command - unless you do that you are not the administrator and can not edit this file.)
Now reboot your system to apply the changes and confirm they work.
sudo rebootI have noticed a small delay sometimes when I just finish booting and login, the network isn't quite ready on the wireless side. It may take a few seconds for the DHCP request (IP address request) to complete and the system to configure. Open Firefox from the menu and load a web page to confirm the changes applied.
(Note: Some USB WiFi adapters have been known to cause latency in Linux. If you added this after latency testing your PC for LinuxCNC you may want to run the latency tests again or at least note the change mentally in case you start seeing performance issues).
¶ Q - How can I display my current IP address settings from a terminal window?
To display your current IP address settings from the command prompt in a terminal window, which helpful when troubleshooting or confirming changes to your /etc/network/interfaces file, you can use the following command:
sudo ip aIt will return results that look like this:
1: lo: <LOOPBACK,UP,LOWER_UP> mtu 65536 qdisc noqueue state UNKNOWN group default qlen 1000
    link/loopback 00:00:00:00:00:00 brd 00:00:00:00:00:00
    inet 127.0.0.1/8 scope host lo
       valid_lft forever preferred_lft forever
    inet6 ::1/128 scope host
       valid_lft forever preferred_lft forever
2: eth0: <BROADCAST,MULTICAST> mtu 1500 qdisc mq state DOWN group default qlen 1000
    link/ether 00:25:64:f0:02:4b brd ff:ff:ff:ff:ff:ff
    inet 10.10.10.2/24 brd 10.10.10.255 scope global eth0
       valid_lft forever preferred_lft forever
3: wlan0: <BROADCAST,MULTICAST,UP,LOWER_UP> mtu 1500 qdisc mq state UP group default qlen 1000
    link/ether 00:9e:95:9c:30:de brd ff:ff:ff:ff:ff:ff
    inet 192.168.2.145/24 brd 192.168.2.255 scope global dynamic wlan0
       valid_lft 82323sec preferred_lft 82323sec
    inet6 2001:569:7511:2300:29e:95ff:fe9c:30de/64 scope global dynamic mngtmpaddr
       valid_lft 14651sec preferred_lft 14351sec
    inet6 fe80::29e:95ff:fe9c:30de/64 scope link
       valid_lft forever preferred_lft forever
1: lo Is the Loopback interface. This is a required interface and is an important concept in Unix so just leave it alone, but it isn't something you need to learn about
2: eth0 In my example, this is my ethernet card (renamed from the new naming style using the kernel boot parameter net.ifnames=0 as detailed on the PrintNC LinuxCNC Q&A page. My IP address is shown on the line that begins “inet” and is 10.10.10.2 with a subnet mask of /24 (shorthand for 255.255.255.0).
3: wlan0: In my example, this is my wireless card. It has both ipv4 and ipv6 enabled. (Note: Do not turn off ipv6, the LinuxCNC folks do that when you run LinuxCNC but oddly they don't check if it is running before turning it off. If you have disabled it, then LinuxCNC will give an odd error and exit. It -wants- to turn it off for you). As with eth0, the assigned IP address (in this case I received the address information from my WiFi router via DHCP) is on the line that starts with inet and my address is 192.168.2.145/24.
If you want to confirm that your Internet connection is working you can ping a website with this command (use CTRL-C to cancel the ping):
$ ping www.news.com
PING www.news.com (35.244.165.204) 56(84) bytes of data.
64 bytes from 204.165.244.35.bc.googleusercontent.com (35.244.165.204): icmp_seq=1 ttl=118 time=5.92 ms
64 bytes from 204.165.244.35.bc.googleusercontent.com (35.244.165.204): icmp_seq=2 ttl=118 time=9.55 ms
^C
--- www.news.com ping statistics ---
2 packets transmitted, 2 received, 0% packet loss, time 3ms
rtt min/avg/max/mdev = 5.920/7.733/9.547/1.815 ms
¶ Q - Is there a fast and easy way to set up graphical remote desktop access to my LinuxCNC machine connected to my PrintNC? I tried regular VNC but it fails with messages about xrandr when I launch the LinuxCNC app itself.
This is happening because LinuxCNC requires support for the OpenGL graphics language to be present in order to draw the user interface panel and provide and 3D representation of your gcode file. Regular VNC serers do not provide sufficient support to enable this. The good news is that I found a fast and easy solution.
NOTE: Before I continue, a word about safety. A CNC machine, especially one of the rigidity and power of the PrintNC, is a serious and dangerous industrial machine. It should only be operated when you are present. Using a “remote e-stop” and a camera as a replacement for being in the same room with the machine is strongly discouraged. WIth the exception of ducking out for a quick bathroom break, you should not run your machine remotely. As one new discord member put it “this is a powerful spinning machine of death”. Never, never, leave a CNC operating unattended over night. Plan your work and break the job in to various toolpaths, giving you natural breaks where you can pause for a meal or stop for the day. Safety first.
ON YOUR LINUXCNC MACHINE (VNC server side)
There is a special version of VNC that encapsulates OpenGL video frames and sends them over regular VNC, which is exactly what we want.
To install it, open a terminal window and run the following command
sudo apt-get update && sudo apt-get install x11vncEnter your password when prompted. Installing software requires superuser/root level access, which is why you are being prompted to confirm your identity.
This command tells the system to contact the configured software repositories, update the catalogs of available software and if that succeeds, install the x11vnc package. You require sudo at the start of both commands. When asked to confirm if you should install all the packages, say Yes.
The system will give you lots of information about what it is doing and after a few seconds return you to your terminal prompt.
NOTE: x11vnc does not run automatically in the background and you must be logged in to the graphical console for it to launch. To be clear, you CAN launch it from a remote shell, but only after the physical console is logged in already. In another Q&A I will explain how to make your console auto-login at boot time, but in the mean time, know that you need to login and be on the desktop before x11vnc will work for you.
To start x11vnc, make sure you are logged in to your Debian desktop (e.g. NOT at the username/password promt), open a terminal window and type (note, the use of sudo is not required here):
x11vnc -display :0The -display :0 paramter tells x11vnc which X session to redirect over vnc. Linux is a multi-user operating system and it is conceivable that multiple people have graphical desktops open. This is unlikely to be true in your case, but you must include the -display :0 session to ensure proper operation.
A big blast of text will appear. If ther are no errors, the last thing you will see from the wall of text is something like:
******************************************************************************
Have you tried the x11vnc '-ncache' VNC client-side pixel caching feature yet?

The scheme stores pixel data offscreen on the VNC viewer side for faster
retrieval.  It should work with any VNC viewer.  Try it by running:

   x11vnc -ncache 10 ...

One can also add -ncache_cr for smooth 'copyrect' window motion.
More info: http://www.karlrunge.com/x11vnc/faq.html#faq-client-cachingON YOUR DESKTOP
There are VNC clients available for windows, Mac and Linux - so no matter your preferred desktop OS you should be able to connect to your machine with this method.
I have tested and can recommend the TigerVNC client and I use it on Windows 10. There are a number of files, because TigerVNC offers both server and viewer options. I used the “vncviewer64-1.11.0.exe” binary. You can download the free TigerVNC client here.
Download and install it the way you would any other software. I don't believe it created a desktop icon so I'll leave that as an exercise for the reader. I just search for it in my windows search bar from the start menu like this: tiger
Being careful not to select my MP3 file of “Eye of the Tiger” or Glass Tigers “Don't Forget Me When I'm Gone”, if I click in the right spot I'll see this appear:
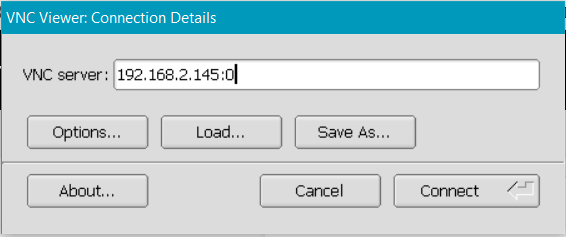
You need to type in the IP address of your LinuxCNC machine. Mine is located at 192.168.2.145. The :0 is required and that tells VNC to attach you to the screen you shared above via the -display :0 parameter on the server side. Click connect and your Linux desktop, exactly as it appears in person, should appear in a window on your windows machine.
Mine looks like this (I haven't configured LinuxCNC yet on this example machine, so while it is in the menus, I don't have a desktop icon):
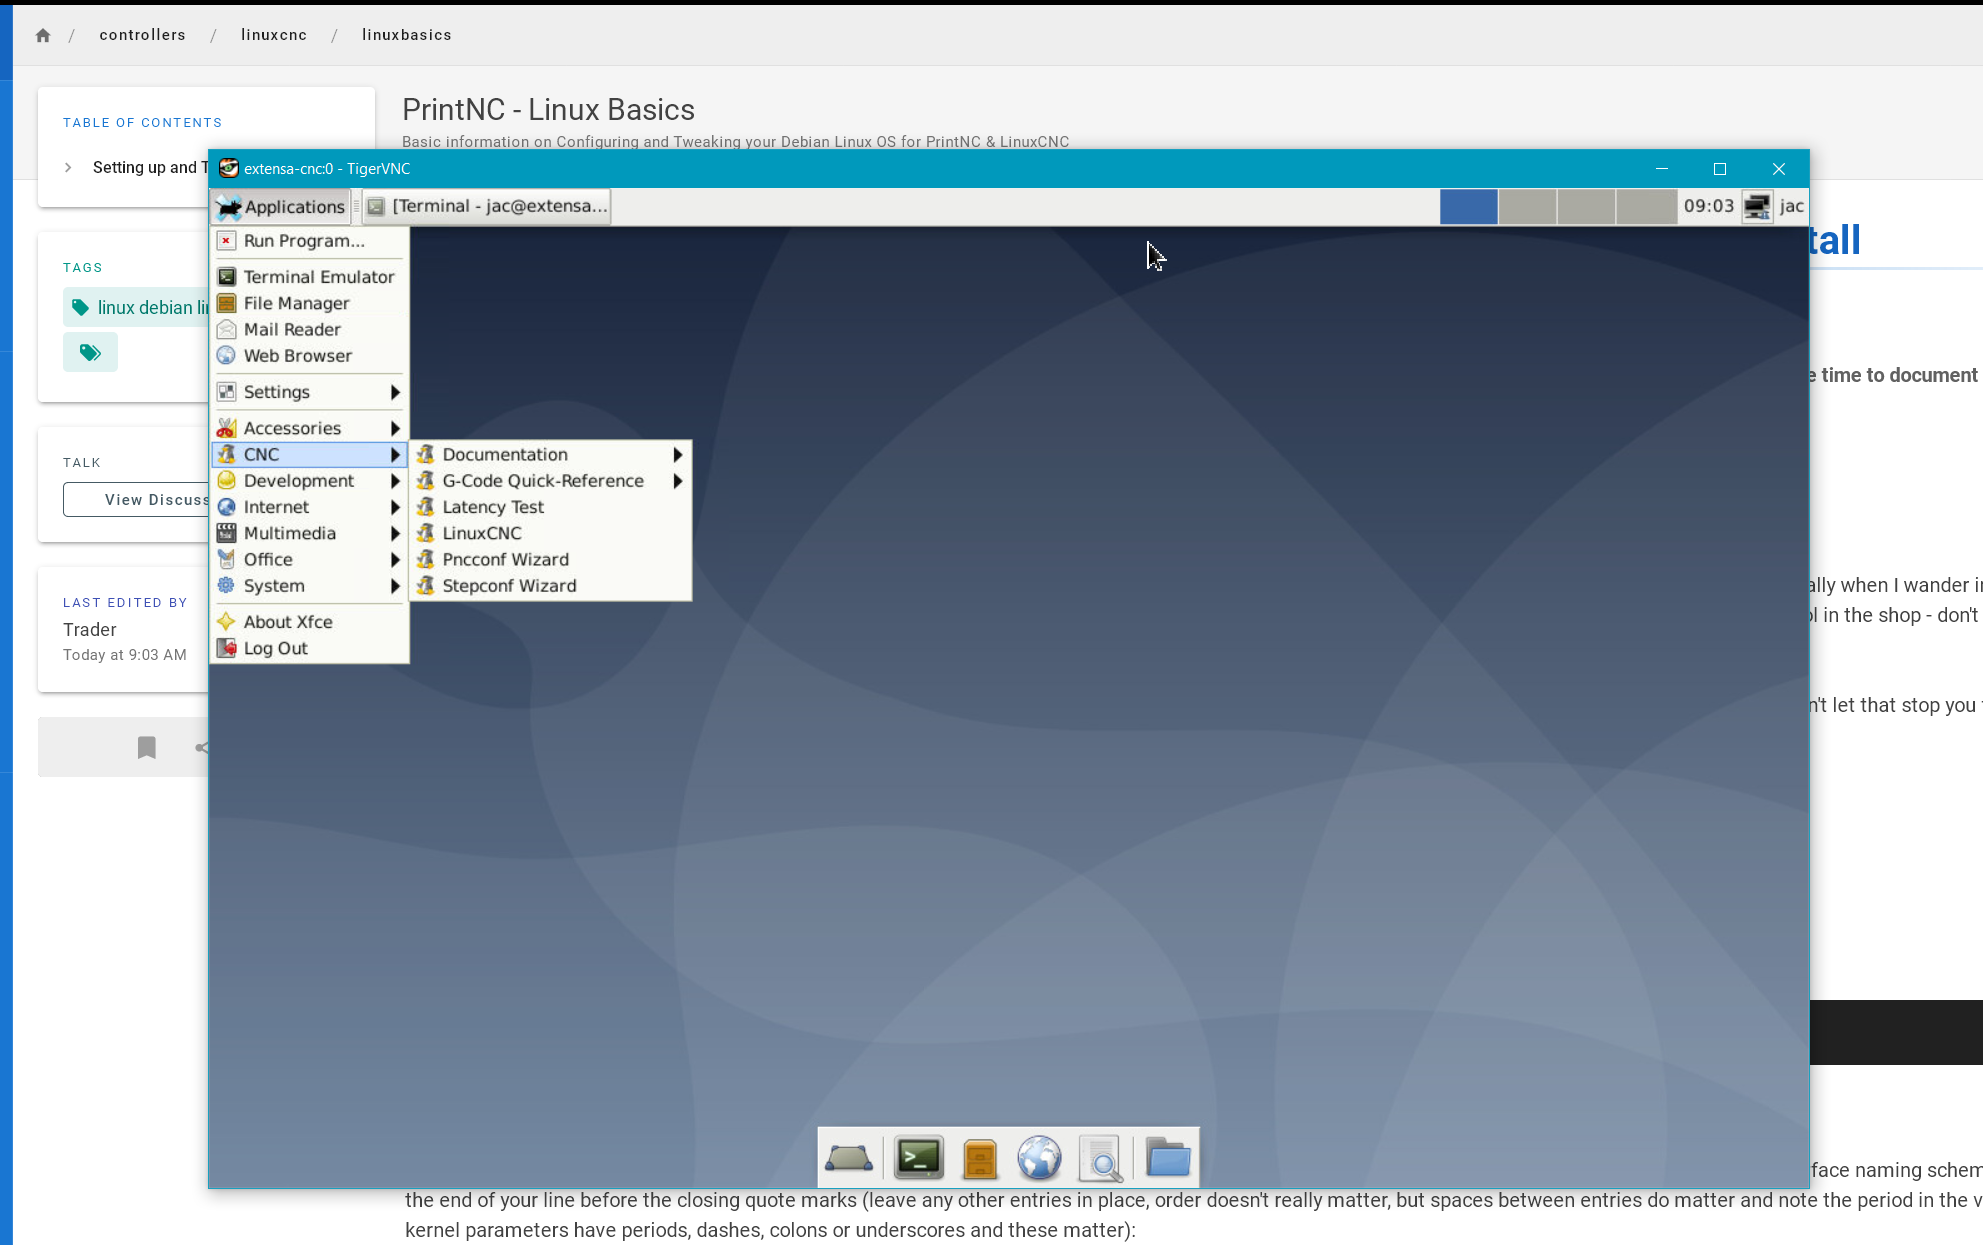
That's it, you're all set. Very helpful during your build/debug or if you are wiring things to pins in LinuxCNC Hal and want to debug from your desktop. I strongly recommend you leave the power OFF to your stepper drivers if doing so. I almost accidentally remotely jogged the machine in to the end of the travel as my e-stops weren't in place and I was working in that area of the LinuxCNC setup.
One final reminder: x11vnc does not run as a service (that would be a security risk since you have to already be logged in), so you will need to start it manually in a terminal window when you want to use it.
¶ TO DO's
-Debian is a linux, debian is not linux… a few sentences on how to tell what the heck you have and why you can't just google for linux answers and assume they will work
-Link in and update David's Optiplex notes, drop to shell and fdisk, workaround
-Broadcom wireless firmware issues and history
-Downloading the iso (which one and what do I do with it), balena Etcher etc
-How do I boot the USB key?
-Favorite tools I install right away, locate, htop, zip, unzip, ethconfig
-Latency test script (poss)
-New realtime kernel optional upgrade
-Sensors config
-bashrc with improved ls switches, rm protection etc
-putty
-pstree
-Ref files /proc/cpuinfo, /proc/interrupts, /proc/cmdline, /etc/version, uname -a,