¶ Description
In order to use a Breakout Board (BoB) you either need to have an older computer with an on-board parallel port (old Dell computers can be inexpensively obtained on eBay et al.).
Failing that, a newer PC can be retrofitted with a PCI parallel port.
¶ Purchasing
The standard Ali Express kit comes with a parallel port Breakout Board. They can also be purchased cheaply on an individual basis.
Make sure you obtain one with isolated inputs or optical relays. These keep you from frying your computer with signals that are too high.
¶ Wiring and Testing
"If you are using a parallel port breakout board, the safe way of operation is to first boot the computer and start LinuxCNC, and after that is done, power up the machine. Some parallel port controllers flip the output bits a bit random on boot, and i've for example encountered a machine where the spindle randomly started spinning up to full rpm if you had it powered during the boot process of the pc."
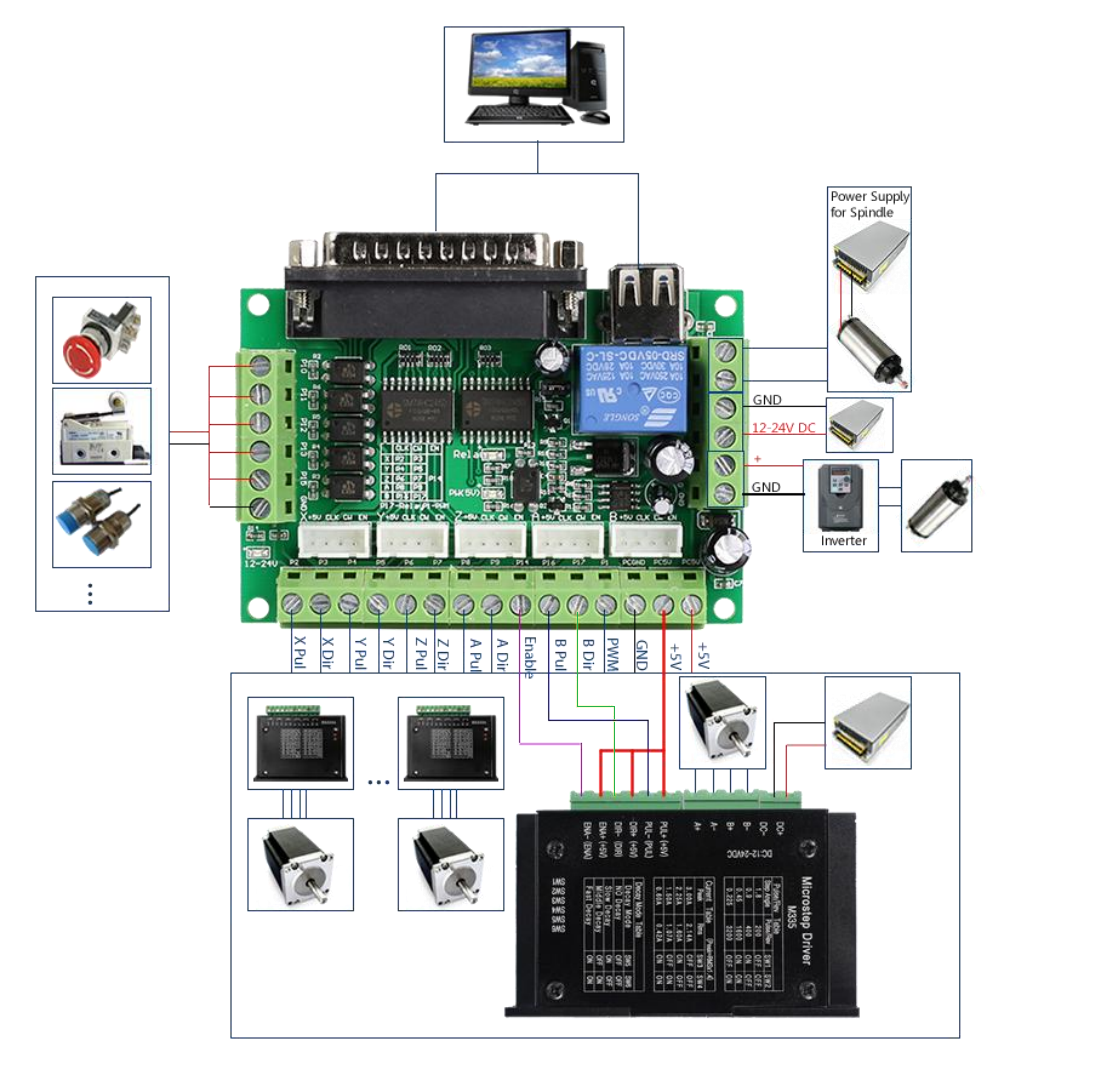
http://www.ijohnsen.com/blog/wp-content/uploads/2016/09/5axis_breakout_board-EN.pdf
Below is a generic wiring diagram for the parallel breakout board. Pin numbers will correspond to the pin definitions that are set in the .ini file above.

¶ Limit Switches
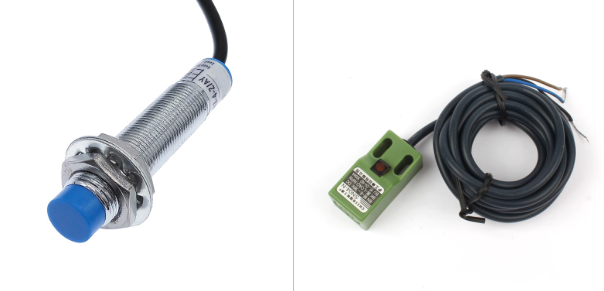
There are two general types of limit switches, Inductive or Physical. For the PrintNC Inductive switches are favoured. There are two physical styles

The tubular styles are easier to attach and adjust. The last common options are PNP or NPN. Typically PNP are used with Mesa and NPN with the parallel bob.
¶ Breakout Board Specific Configuration
¶ LinuxCNC Stepconf Wizard
Since most PrintNC machines differ in some way, users are highly encouraged to run through the LinuxCNC Stepconf Wizard themselves.
First port of call is the Stepconf Documentation Wiki. That and the remainder of this section will help you through the wizard.
¶ To Begin
Click the Start button.
If this is your first visit or you are starting a new configuration, you'll want to Create a new configuration from on the ‘Start’ page.
A desktop launcher is also a handy thing to have for fast opening of LinuxCNC complete with your new configuration.
¶ Base Information
Give your configuration a Machine Name. Keeping this lower case with no whitespace (spaces or tabs) will make your life easier in Linux.
Note: Something to remember: this is referenced to using <machine_name> further down this page.
Axis configuration should be ‘XYZ’ for the PrintNC.
Choose the units you wish to work in.
For most PrintNC users, the ones who use the DMxxx stepper drivers, Driver type should be ‘Other’
Find your stepper driver's; step time, step space, direction hold and direction setup information on the Stepper Driver Timing Wiki.
E.g. for DM556 users, this will be; 2500, 2500, 10000 and 5000 respectively
If you haven't already done so, now is a good time to conduct your Latency Testing using the Latency Test Wiki.
Place your Maximum Jitter value into the box.
¶ Parallel Port 1
Should be fairly self explanatory. This is where you tell LinuxCNC about your pin configuration i.e. what you plugged into the BOB and where.
Fill out both the Outputs and Inputs columns to match your own BOB wiring.
Don't forget to de-allocate the spindle pins (14 and 16) if you're not using PWM to set the spindle speed.
¶ Options
Here is where you choose your LinuxCNC front-end.
Either choose AXIS or Gmoccapy.
This is also where can add additional components. Refer to the Stepconf Documentation Wiki . If you're unsure simply ignore these for now.
¶ Axis [X, Y, Z]
This is the important part. This will determine how accurate your physical and DRO measurements are.
The Motor steps per revolution information will be in your stepper motor's datasheet. This is normally given in degrees per step, which you should use to divide 360 (degrees in a full circle/revolution) by to calculate your value. For instance, if your motor turns 1.8° in a single step, you do (360/1.8 = 200).
Your Driver Microstepping value is derived from the dip switches you set on the stepper driver. For instance, if you set ‘Pulse/rev’ to 800 (a.k.a. ¼ microsetting), you take this number and divide it by the Motor steps per revolution value above, so (800/200 = 4).
Leave the Pulley Teeth values at one for direct drive PrintNC machines.
Leadscrew Pitch is either provided in mm/rev (mm travelled per revolution) or rev/in (revolutions required for every inch of travel). The former is simpler, since you take the pitch from the latter digits of your lead/ball screw type i.e. 1610 (16mm diameter/10mm pitch) and pop that in. The latter requires a simple calculation (<mm in an inch> / <pitch in mm>), so for a 1610 this becomes (25.4/10 = 2.54) - in other words, it takes 2.54 revolutions of the lead/ball screw to move the carriage 1 inch.
Reminder: Your Z Pitch will be different to your X and Y if you got the Ali kit.
Maximum Velocity dictates how fast your carriage can move and is measured in machine units (see the Base Information section above) per second, so either mm/s or in/s. According to Hoges, a good starting point would be around 150mm/s or 6 in/s. As you'll see, this is already very fast. If you're uncomfortable with this, halve it and work up slowly.
Maximum Acceleration measured in machine units per second per second (not a typo). The suggested value is 1000mm/s/s or 40in/s/s but again if this seems too fast or makes you nervous, halve it and work up from there as your confidence grows.
It should be safe to keep Home location’at the default value for now. More information can be found in the HOME description on the Wiki.
Unless you know the exact dimensions of your allowable travel, it should be safe to keep Table travel at the default value.
It should be safe to keep Home Switch location’at the default value for now. More information can be found in the HOME_OFFSET description on the Wiki.
It should be safe to keep Home Search location’at the default value for now. More information can be found in the LinuxCNC Homing Configuration Wiki.
It should be safe to keep Home Search velocity at the default value for now. More information can be found in the HOME_SEARCH_VEL description on the Wiki.
It should be safe to keep Home Latch direction at the default value for now. More information can be found in the HOME_LATCH_VEL description on the Wiki.
¶ Required PrintNC Manual Tuning
The LinuxCNC Stepconf Wizard is a valuable resource for simplifying the creation of your basic configuration files.
However, since the PrintNC houses dual-motors on the Y axis, some manual hacking is required to ensure the machine becomes fully functional.
There is a good forum post in the linuxcnc forum explainig how to change the ini and hal file to add the additional Y-Axis.
¶ LinuxCNC Configuration Files
There are 2 important files that you, as a LinuxCNC user should become familiar with:
Note: Remember <machine_name> from the Base Information section above?
- <machine_name>.hal
- <machine_name>.ini
These usually reside in the directory /home/$USER/linuxcnc/configs/<machine_name>/
Note: You'll often see /home/$USER/ abbreviated to $HOME or more usually just ~.
Note: The directory paths above are (nearly) usable i.e. $USER equates to your username in Linux-foo, so once you become proficient in Linux and begin to use the terminal (like all the cool kids!) you can copy and paste them in. The “nearly” caveat above is that you still have to replace <machine_name> with the one you chose earlier in the process.
The simplest method to edit the config files for Linux newbies is via the file manager Applications > File Manager
The file manager should open in your home directory /home/$USER
Navigate to and double-click on the files. They should open in LinuxCNC's default text editor Geany, which should look familiar.
¶ HAL file
For information regarding *.hal commands/file see the Basic HAL Reference Wiki.
[TBC]
¶ INI file
For information regarding *.ini files see the INI Configuration Wiki.
[TBC]